Canonical URLs can sound intimidating. Learn how to use this tag correctly to prevent or solve technical and off-page SEO issues (duplicate content).
Today, I’m going to talk about canonical URLs (or the fabled “link rel canonical tag”). We are going deep into the nerd woods on this one, folks, so buckle up.
I’m going to go over what good canonicalization looks like and how this can really mess up your website if you get it wrong. If you get it right, you can clean up a lot of really bad duplicate content issues and fix a ton of technical behind-the-scenes problems.
Let’s get going.
Just a quick reminder before we dive into the technical weeds of canonical URLs. These are part of SEO and SEO is just one piece or one channel of digital marketing.
By approaching the topic of canonical tags we’re zooming in on one particular channel of what should be a much larger, more comprehensive digital marketing strategy.
Even within SEO, canonical URLs or the link rel canonical tag are just one tiny component of a much larger piece of this entire puzzle—for a larger perspective on things, you should check out our SEO Checklist.

90+ SOPs, Templates, AI Prompts, And Video Tutorials To Supercharge Your Business
Unleash the Power of SEO and 10x Your Traffic from Google
Get the SEO Checklist sent to your inbox, for FREE!
What Are Canonical URLs?
“Canonical URLs” is just a fancy, overly technical word for saying “This is how we deal with duplicate or similar content”.
The link rel canonical tag that we use on our web pages tells search engines where the original version of a page lives. This is effectively like pointing to the “master copy” of a page.
Modern web applications create this massive problem where we have lots and lots and lots of different versions of the same thing. If we weren’t handling this by adding canonical tags, it would be a massive problem for the Internet and search engines to create a sitemap for your website.
A canonical tag on a webpage tells search engines which version of similar pages you want ranking. That is why this is really, really vital for eCommerce or WordPress sites and for any modern web application that has a sorting problem.
As an example, I used to manage search engine optimization at Airbnb and this was a massive problem for us.
If you have a list of a thousand homes in a particular city and you have lots of different filters, there are lots of different ways to organize and arrange that page.
Sure, you have a thousand homes but:
- Some of them are the entire home.
- Some of them are shared.
- Some of them are two bedrooms, four bedrooms, and eight bedrooms.
- Some of them have a pool.
- Some of them are family-friendly.
- Some of them have a sauna.
- Some of them have instant bookings available.
Every time you add a layer of filtering, you’re essentially rendering a new different type of page on the same dataset, on the same thousand listings, but with slightly different content, and maybe with some additional parameters on the URL.
If you do this ad nauseam for as many possible filters as you can think of, you essentially get infinite pages with different URLs—and that becomes a giant mess for any search engine to deal with.
The basic idea here is we’re saying “Okay, we still want our users to be able to filter. We still want our users to be able to render the page in different ways, but we want to tell the search engine: “Hey, Google. I know it looks like we have a thousand pages but really we only have one.”
That’s what the canonical page is for. It’s a very specific suggestion to search engines to say, “This is the master copy of the URL. Only put this one in search results and ignore the rest.”
Another way to look at canonical URLs is from the perspective of a duplicate piece of content.
Duplicate content is the problem that arises when search engines find several copies of the same content, which creates a problem when they try to rank-order them.
- It can hurt your crawl budget. Basically, Google.com and other search engines like Yahoo allocate a certain number of requests per day, per week, or month—and if they’re spending all that time crawling pages you don’t want to crawl, that’s hurtful to you as a webmaster.
- It can lower rankings. If Googlebot sees a pattern of duplication on your site over and over and over again, it can drop you in the rankings. Obviously, that’s not good.
- It can send users to low-quality pages. Let’s say you don’t care about your crawl budget. Let’s say duplicate content isn’t hurting your rankings yet. If users are finding your unnecessary garbage in the search results, that is not good at all.
When and how to use canonicalization
Let’s look at some examples here.
Let’s say I’m in charge of Nike.com and there’s a product page on our website dedicated to men’s shoes and I want it ranking number one in Google for the term “men’s shoes.”
If I’m on “nike.com/mens-shoes” (the original version of the page) and I want to implement a canonical tag here, I would use a link tag with a rel=”canonical” HTTP header attribute and the href attribute “nike.com/mens-shoes”.
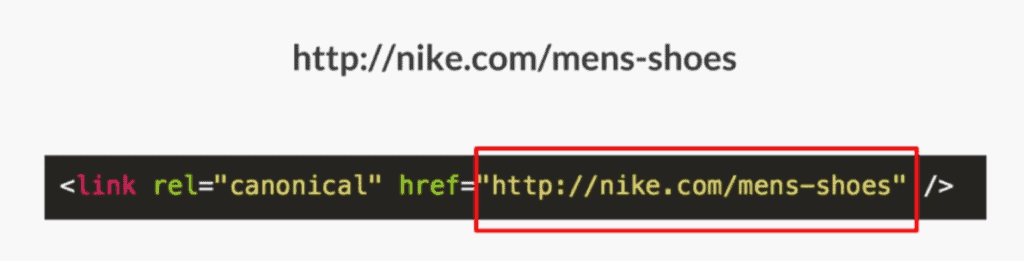
This is called a self-referencing canonical tag. The original master copy of the page is pointing to itself and that’s fine. I can go ahead and do that. There’s no problem at all. I am self-canonicalizing here, and this is a fine suggestion for Google.
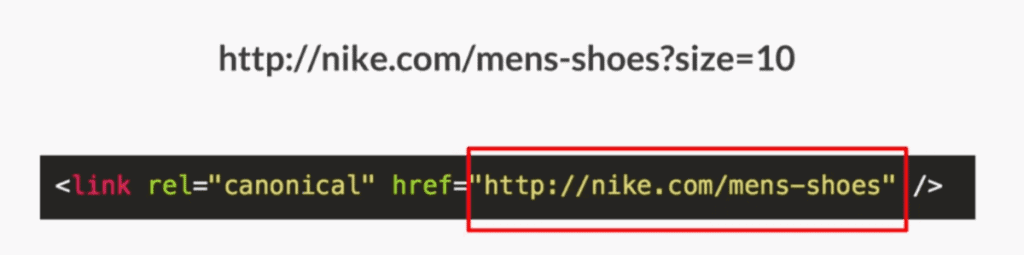
Let’s look at that same page with a filter on it.
Let’s say I go to “nike.com/mens-shoes” and I want to sort this page by everything that’s size 10, and so I add a filter. Maybe a URL parameter gets added to the URL (something like “?size=10”).
I now have a new page that has a new filter on it, but I don’t want that page in Google search results, so the canonical link element stays the same.
The page exists for users but if Google were to ever find it, it will see that canonical tag in the head and that would be like us saying:
“You’re on this page, but actually don’t index it. Please index this other one which is my preferred URL, the master copy, and any links that this page gets, can you go ahead and pass that over to the master copy.”
This would be an example where there isn’t any searcher intent for this particular type of phrase (e.g. “Nike shoes size 10”)—so I didn’t want this page ranking.
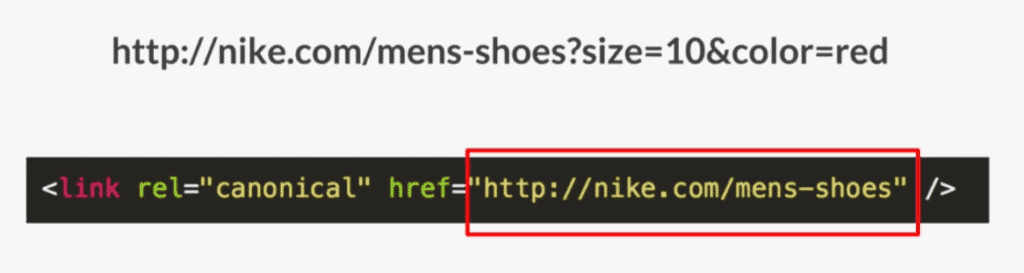
Let’s do one more scenario:
Let’s say I had one more filter for red shoes, so the URL would be “nike.com/mens-shoes?size=10&color=red”.
Now we’re looking at all the Nike men’s shoes that are size 10 and the color red. It’s the same thing. It’s another page. It’s a different set of filtering. It’s more specific but I don’t want this page in the index.
We’re going to keep the canonical tag back on the master copy as this URL sort of gets more and more parameters on it, we’re still pointing back to the master copy.
In every one of those situations, I essentially had too many duplicate URLs that were not useful to users coming in from search engines—so I killed all of these pages and added a canonical version of each of them back to the master copy.
However, let’s look at a different situation here.
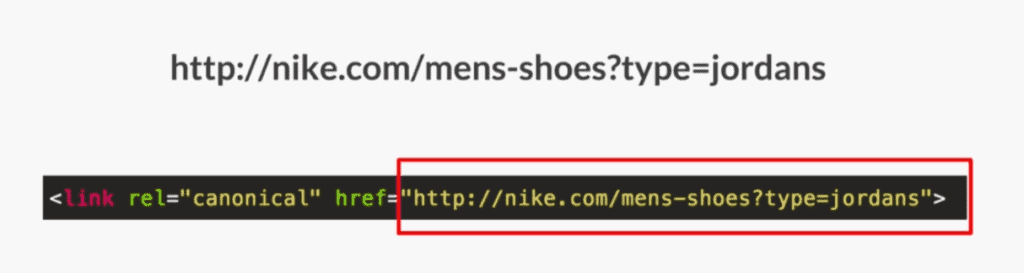
Let’s say I have the same URL however, there’s a certain type of filtering that’s really important to us. In this case, it’s Jordans: Nike’s Jordan shoes.
Let’s say I am promoting on the homepage, there are 25,000 people a month searching for Nike men’s Jordan shoes, and I want this page in the index.
In this case, I would self-canonicalize the URL with the filter for Jordans: nike.com/mens-shoes?type=jordans.
This would be one way to capture a bunch of search volume that may not be captured if you were to canonicalize back up to the core page because you’re not able to get it into the index.
In this situation, when Google goes to this URL, I would be saying to Google: “Hey, actually this page is the master copy. Please put it in your index.”
We do this because the page is important to us. It’s a unique and good experience for users and it has a search volume behind it. So we decided to keep it in the index.
When you do this, you want to watch out and make sure that the content of this page is not an exact duplicate of the original mens shoe page. Make sure there’s some differentiation there.
Why canonicalization is important
The way to think about the rel canonical tag and canonicalization, in general, is: “What would search results look like if Google didn’t have a way to remove duplicate content?”
Next time you’re on an eCommerce site, every time you click anything, watch the URL bar. It is a massive, massive, massive problem.
Think of it: I have a ton of URLs that are all effectively the same thing (mens-shoes, mens-shoes?size=10, etc.). Think of every single possible permutation of this.
It can start to get really messy, really quickly.
The internet would suck without this.
It’s really good that Google has built in a technical way to handle this kind of issue.
Canonical URLs tips to keep in mind
Aside from the basics explained above, there are a few more tips you might want to keep in mind:
Self-referential canonical tags are fine
There’s a lot of debate out there at a really high technical level with massive web applications.
Some people like to not do self-referencing canonical tags. I’ve seen evidence for and against this. It really depends on your situation. For example, TripAdvisor is doing some really interesting stuff on this. Take a look at their source code and check out what they are doing.
If you’re just getting into this, self-referencing canonical tags are fine.
Canonicalize your homepage
Personally, I find homepages to be the most oddly linked to things.
There are a ton of different ways to render homepages, there’s http://www.website.com, https://website.com, www.website.com/index.php, www.website.com/index.html, and so on.
People mess this up all the time.
Pick a core version to render your homepage and canonicalize every possible version to the core one.
Canonical tags are a suggestion, not a directive
Robots.txt files are directive. 301 redirects are directive. Using these things, you’re telling a search engine “Hey, you have to do this”.
Canonical tags are, however, a suggestion.
Google’s point on this is that webmasters mess this up a lot, so Google actively admits they’re allowed to ignore you if they think you’re shooting yourself in the foot.
Canonical tags are one additional suggestion that we give to search engines to advise them on how to handle pagination issues and duplicate content.
So, if you have put a canonical tag, it’s not working and if you’re wondering what happened, dig a little deeper into what you are doing because Google may be getting mixed signals from you.
Google says they won’t absolutely enforce the canonical tags—but more often than not, I see that they do.
Cross-domain canonicalization is OK
Let’s say you run a publishing site and you have 20 different sites and every time you write a new blog post, it cascades across all of your different domains.
It’s totally fine to write a blog post for website1.com and then post that on website2.com, website3.com, and website4.com and then cross-domain canonicalize back to the original.
Anything that does cross-canonicalize won’t show up in the index—so, by doing this, you basically tell Google “Hey, don’t index this page as the original version is over here.”
However, keep in mind that any links you get on any of those pages should be attributed back to the original master copy.
Don’t send mixed signals
There are a lot of ways to mess this up.
For example, you could take two pages and canonicalize them to each other. Or you could take two pages and canonicalize one to the other one and 301 redirecting one to the other one.
Don’t send mixed messages. Figure out what your plan is, figure out what you want your master copy to be, and hammer that plan.
Make sure it’s all very clear in every element.
Keep in mind that 301 redirects and canonicalization have different effects
A lot of people ask “OK, essentially, I want to kill a bunch of duplicate pages and I want to consolidate them all into one page. Should I use a canonical tag or a 301 status code?”.
First of all, remember that a 301 redirect seems to send a stronger signal in terms of link equity. For example, if you have two deprecated pages, you want to kill them, and you want to pass all those links over to a different page, a 301 redirect will feel more helpful.
At the same time, keep in mind that 301 redirects and canonicalization offer different experiences for the user.
- With a 301 redirect, the user moves to the new end page.
- With a canonical link, they do not. Basically, you’re telling Google “Hey. The page you’re on is a copy. Ignore it and send any links over to this other page”. However, the user will still stay there—so keep this in mind.
You can’t use canonical tags for link manipulation
Some people say “OK, well, then all I have to do is get a bunch of links to a page and then canonicalize it to a completely unrelated page. Then I can rank super-high and win the Internet.”
It doesn’t work that way.
In fact, it looks like Google uses document relevance to handle this. They want to make sure that what you’re sending is an actual copy.
If the page you’re canonicalizing to is dramatically different than the one you’re currently on, it will be ignored.
For example, if you have a page about blue widgets and you’re canonicalizing it to a page about gorillas, it’s not going to work.
That’s it—that’s really all there is to canonical URLs and the rel canonical tag. Using the information in this post, you will be able to correctly canonicalize your duplicate content, which is a very important element of the entire Search Engine Optimization process.
Even More Resources
If you’re new to SEO and online marketing, be sure to download both our digital marketing strategy guide and our SEO strategy guide for a high-level overview of how this stuff works.
90+ SOPs, Templates, AI Prompts, And Video Tutorials To Supercharge Your Business
Unleash the Power of SEO and 10x Your Traffic from Google
Get the SEO Checklist sent to your inbox, for FREE!