Your Pixel Says It’s Working. It Might Be Lying.
Picture this: you open Meta Events Manager, you see PageView events rolling in, purchase conversions are showing up, everything looks healthy. So you leave it alone. Reasonable move.
Except Squarespace added a native Meta Pixel integration sometime around 2023, and if you set up your pixel manually before that, you may now have two copies of the pixel firing on every page. The native integration does not scan for existing code and quietly disable it. It just runs alongside whatever you already injected. The result is duplicate PageView and Purchase events that show up in Events Manager looking completely normal, because they are real events, just counted twice.
That matters because Meta’s ad algorithm uses your conversion data to decide who to show your ads to. Feed it doubled signals and it optimizes on garbage. Third-party analysts have flagged that polluted event data can corrupt a meaningful share of reported conversions, though the exact figure varies by setup.
The fix is not complicated, but you have to know the problem exists first. Most people don’t check.
If You’re on Business or Commerce, Just Do This
Before touching any code, check whether you already have pixel code sitting in your site’s header. Go to Settings → Advanced → Code Injection and look for any script tags referencing fbq or facebook.com/tr. If you find one, delete it and save. Leaving it in place while also connecting the native integration is exactly how duplicate events happen.
Once that’s clear, here are the steps:
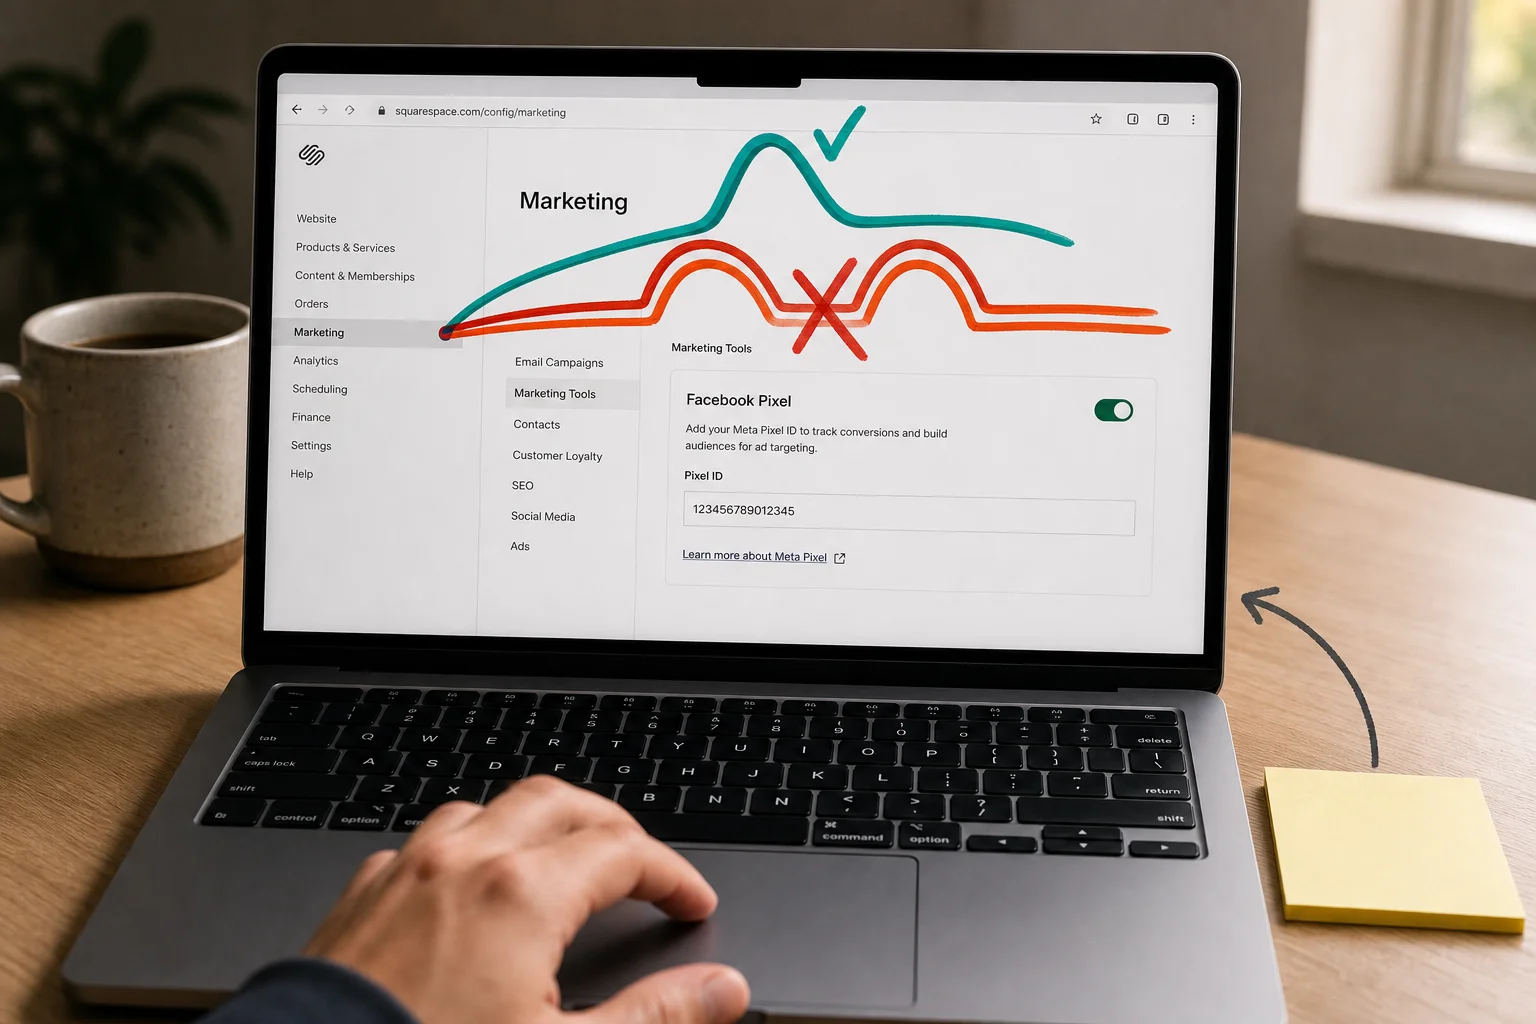
- From your Squarespace Home Menu, click Marketing.
- Select Meta Pixel & Ads from the marketing options.
- In the Pixel ID field, paste your pixel ID. You can find this in Meta Events Manager under your pixel’s settings.
- Click Save.
That’s the entire setup. Squarespace handles the rest on the backend, including a connection to Meta’s Conversions API, which means some event data goes server-to-server rather than purely through the browser. You don’t need to configure that separately.

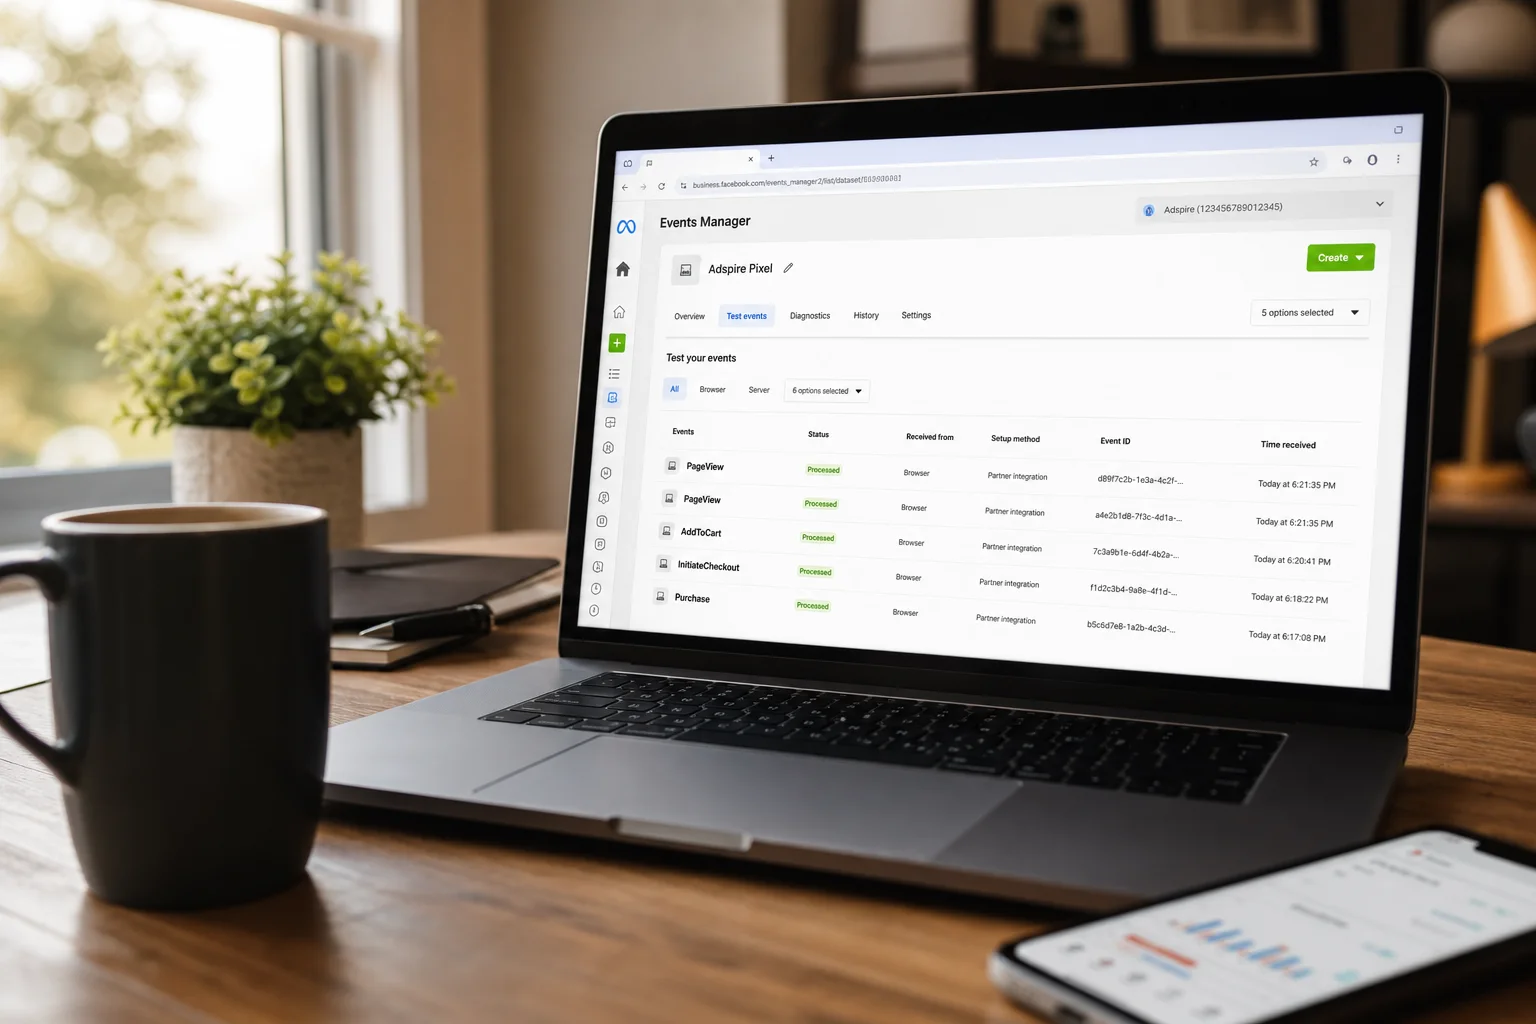
Once saved, open Events Manager and browse a few pages of your live site. You should see PageView events appear within a couple of minutes, though Squarespace’s documentation notes it can take up to an hour. The pixel ID should be visible in the Events Manager interface, and the status indicator will show green when the connection is active.
Out of the box, the native integration tracks PageView, ViewContent, AddToCart, InitiateCheckout, Purchase, and CompleteRegistration automatically. You get those six without writing a single line of code. One constraint worth knowing now: the native panel accepts only one pixel ID per site.
When Squarespace won’t let you use the native integration
Squarespace’s native Meta Pixel integration is locked out of the Personal plan. So is site-wide Code Injection, which means you can’t paste the pixel script into your header as a workaround either. Both require Core or above.
If you’re not running paid Meta ads yet, this costs you nothing. The pixel only matters once you’re spending money and need conversion data to optimize campaigns.
If you are running ads on a Personal plan, you’re missing everything: which pages visitors land on, which products they view, whether they buy. Meta’s algorithm has no signal to learn from, so your targeting stays generic and your cost per result stays higher than it should be.

The math is simple: if your monthly ad spend exceeds the price difference between Personal and Core, the tracking data will likely pay for itself. If you’re spending less, or just testing, the manual workarounds in the next section may be enough.
So you’re stuck on a lower plan, or you need something the native integration can’t do
Manual code injection is the right call in two situations: you’re on a Personal plan where the native integration isn’t available, or you need to fire a custom event the native integration doesn’t handle, like tracking a lead form submission on a non-commerce page.
If neither applies, use the native path. Manual injection is harder to maintain and easier to break.
For site-wide pixel placement, go to Settings > Advanced > Code Injection and paste Meta’s base pixel code into the Header field. The snippet initializes with fbq('init', 'YOUR\_PIXEL\_ID')PIXELID’)` followed by fbq('track', 'PageView'). Save, and the pixel fires on every page load.
For a custom event on a specific page, like a Lead event on your thank-you page, go to the Pages panel, hover over the page, click the gear icon, select Advanced, and paste into Page Header Code Injection:
<script>
  fbq('track', 'Lead');
</script>
Critical warning: if the native integration is active at the same time as manual header code, both fire. You get duplicate PageView events on every page, which corrupts your campaign data. Before adding manual code, either clear your Pixel ID from Marketing > Meta Pixel & Ads, or remove the injected code.
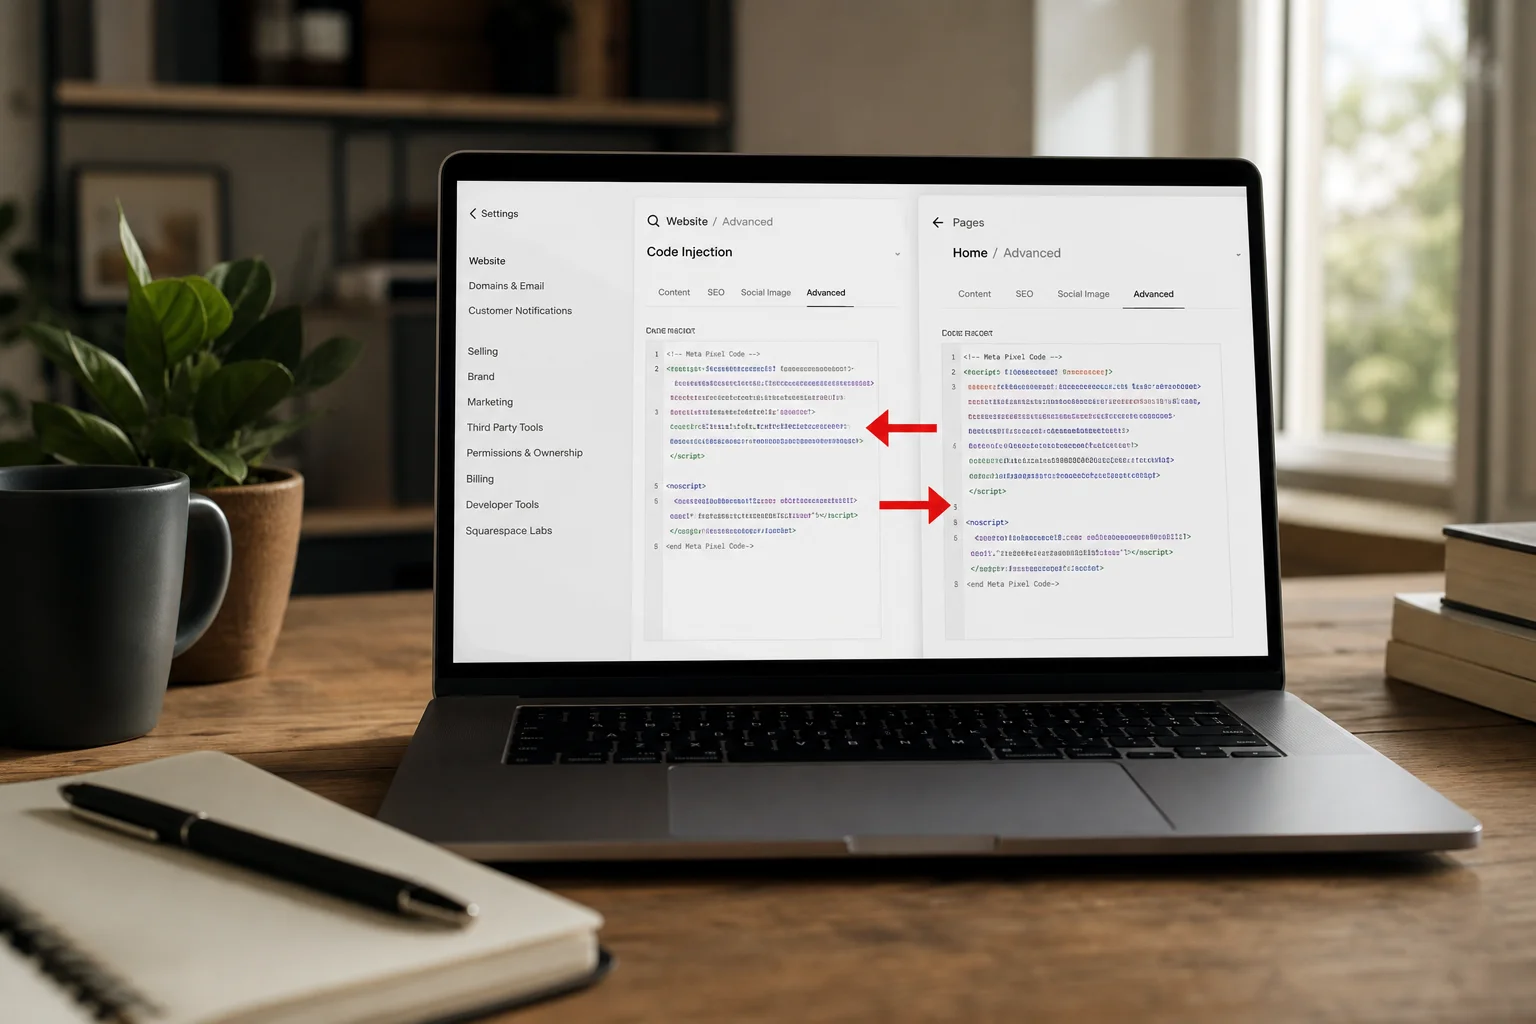
One edge case: blog pages behave differently. Individual blog posts need the Post Blog Item Code Injection field, not the standard page-level field. Test on your actual template before assuming it worked.
What a busted pixel setup looks like versus a clean one
If you connected the native integration and left old manual code in your header, both fire at once. Every page load sends two PageView events. Every purchase sends two or more Purchase events. Meta’s bidding algorithm treats each as real, so your reported ROAS looks better than it is while your actual spend drifts toward audiences built on bad numbers.
Install the Meta Pixel Helper Chrome extension and load your homepage. Two PageView entries in the popup, often with matching timestamps a second apart, mean you have a duplicate problem. One entry means you’re clean.
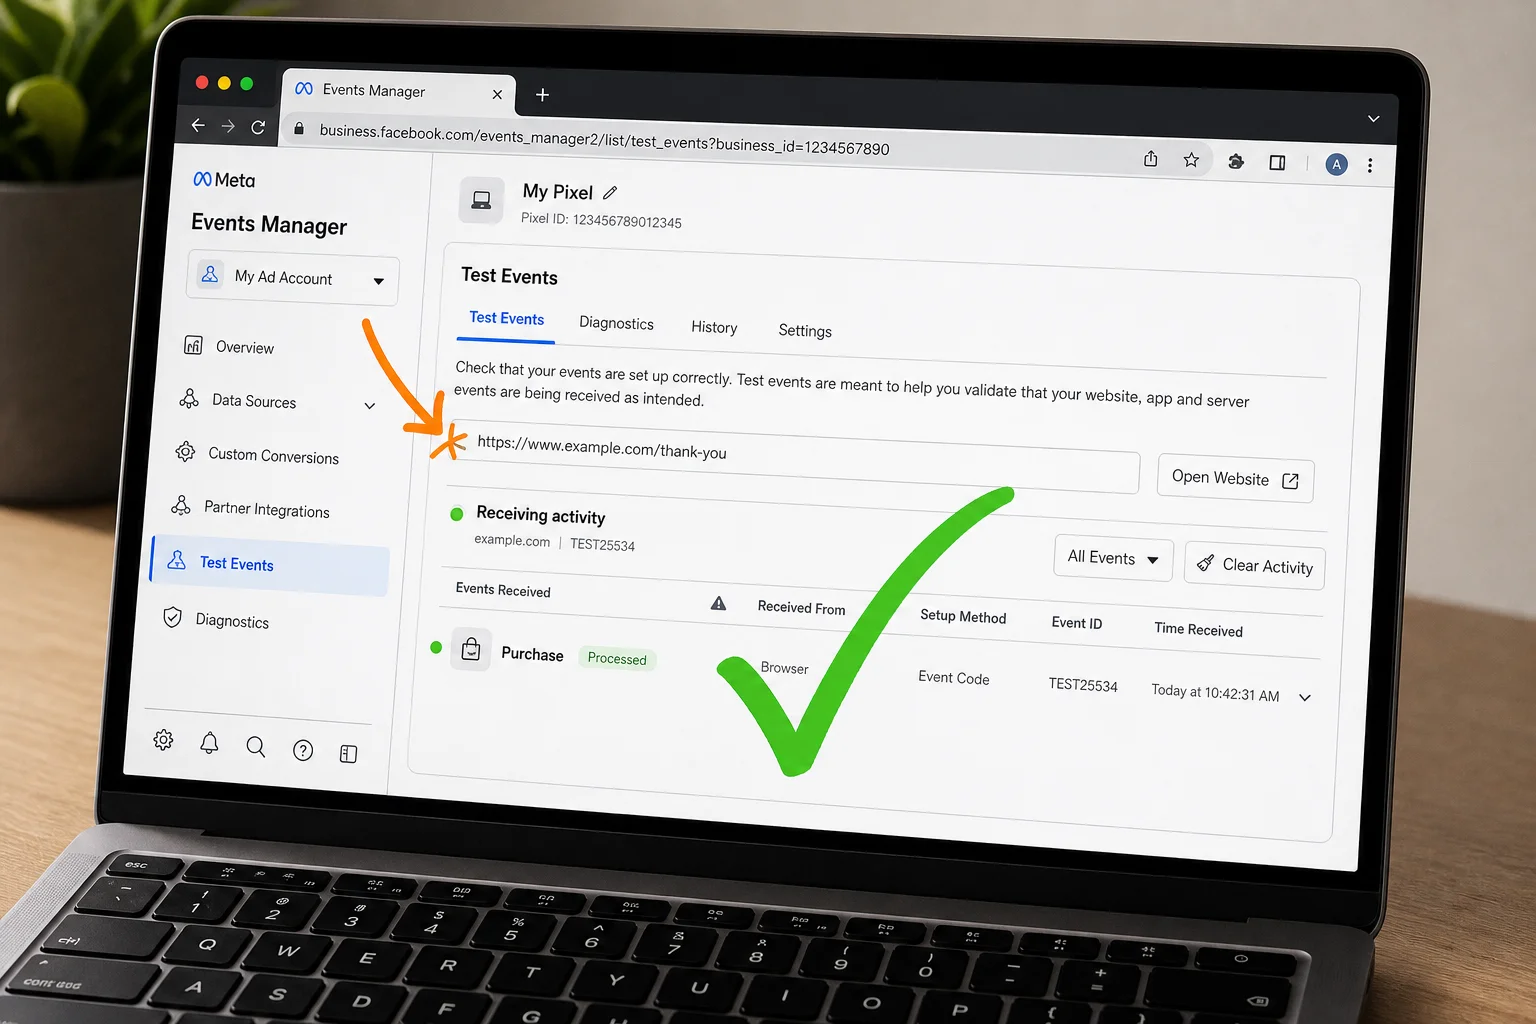
For purchase events, open Meta Events Manager’s Test Events tab, trigger a test checkout, and watch the log. Multiple Purchase entries within seconds of each other confirm it. Pixel Helper only catches browser-side events, so if you’re also running the Conversions API, Events Manager is the only place you’ll see the full picture.
The fix: pick one method and kill the other. Clear your pixel ID from Marketing > Meta Pixel & Ads if you’re keeping manual code, or pull the injected header code if you’re keeping the native integration. Re-test before running campaigns.
Three checks that tell you the pixel is actually firing
Once you’ve cleaned up your setup, don’t just assume it’s working. Run these three checks in order.
**Step 1: Install Meta Pixel Helper and visit your homepage.** The extension icon turns blue with a number badge when a pixel is detected. Click it. You want to see your Pixel ID, a green PageView event, and exactly one of each. Yellow means a warning. Red means an error. Gray icon means no pixel found at all.
**Step 2: Open Events Manager > Test Events, paste your site URL, and navigate to your order confirmation page.** This is the step most people skip. Testing only on the homepage tells you nothing about whether purchase events fire. Events typically appear within a minute or two. If nothing shows after 10 minutes, the integration probably didn’t save correctly. Go back and re-check your pixel ID in Marketing > Meta Pixel & Ads.
Step 3: Check Events Manager Diagnostics. This tab flags duplicate events, missing parameters, and aggregated-event warnings that Pixel Helper won’t surface.
One important caveat: Pixel Helper can miss dynamic events like AddToCart if they’re triggered by AJAX rather than a full page load. Test Events catches those.
When everything looks fine but the pixel still isn’t working
Most Squarespace pixel failures come down to the same handful of causes.
Pixel shows as “not found.” Check your Pixel ID first. A single extra space from copy-pasting is enough to break the connection. Also confirm your site is published: Squarespace only fires pixels on published pages, not trial mode.
PageView fires but AddToCart and Purchase don’t. The native pixel ID field tracks basic traffic only. For store events, you need to connect through Facebook and Instagram Shops, not just paste an ID.
Visitors decline your cookie banner and disappear from reporting. That’s working as intended. Squarespace blocks the pixel for users who decline consent. If this gap is hurting your remarketing, a third-party CMP with Consent Mode v2 support is the only real fix.
Your subdomain tracks nothing. The native integration covers your primary domain only. Subdomains need pixel code added via injection.
One genuine upside of the native integration: it runs a Conversions API layer alongside the browser pixel, recovering some events that ad blockers would otherwise swallow.
So which method should you actually use?
If you’re on a Core plan or above and just want purchase and traffic data, use the native integration. It’s the right default.
If you’re on Personal or below, or you need custom events on non-commerce pages, code injection is your only path.
If you already have both connected, your most urgent task isn’t setup. It’s checking for duplicates. Open Events Manager, pull up your pixel’s event activity, and look for PageView or Purchase events firing twice within the same second. That’s the one thing most people skip, and it’s the one thing most likely to be silently corrupting your data right now.
References
- Squarespace Help: Using Meta Pixel with Squarespace — Squarespace Help Center
- Squarespace Help: Using code injection — Squarespace Help Center
- Meta for Developers: Get started with Meta Pixel — Meta for Developers
- Meta for Developers: Meta Pixel Helper — Meta for Developers
- CookieScript: Squarespace and Google Consent Mode — CookieScript