Today, you’re going to learn how to set up a password manager for your team. There are lots of password database options out there for both PC & Mac: Dashlane, 1Password, Keepass, Sticky Password, iCloud, etc – there are browser extensions for Firefox, Chrome, Opera & Safari – today we’ll be showing you how to do this with our favorite: LastPass.
Heads up: even with a password manager, you should always still use multi-factor authentication!
Managing passwords was one of the most insanity-inducing things I ever had to deal with. I waited way too long to fix this. It drove me crazy. It was so frustrating.
It’s embarrassing to admit, but getting a password manager changed my life. It did. I cannot explain to you how good it will feel once you solve this problem, especially if you have a lot of logins.
So, let’s get going—In this tutorial, we will go through the exact step-by-step process that you need to set up a password manager account to share with you and your team.
This should take about 40 to 60 minutes (depending on how many passwords you have – and how easy it is for you to remember them).
Overview
Here is a high-level overview of this process:
- The goal: To have an effective and reliable password security tool for managing and securing all of your passwords.
- The ideal outcome: Your business activities are easier to manage because you will be able to create strong passwords for different accounts and manage them in the same place.
- Why is this important: Many people tend to use the same password on their accounts over and over again (and more often than not, it’s just a variation of the same password). This can cause you trouble in the future. A password management account will allow you to create more secure passwords, as well as share passwords with your team in the future.
- When this is done: You do this once for all of your existing accounts, and then do it again every time you sign up for a new website or service online.
- Where this is done: This will be done in your web browser, more specifically, in LastPass password manager, which is, in my opinion, one of the best password managers out there.
Getting Started & Importing Accounts
Setting up a LastPass account may take a bit of time (mostly because you will have to remember all of the accounts you’re using and all of the passwords you’re using for them as well).
Here’s the complete tutorial guide on how to set up your LastPass account:
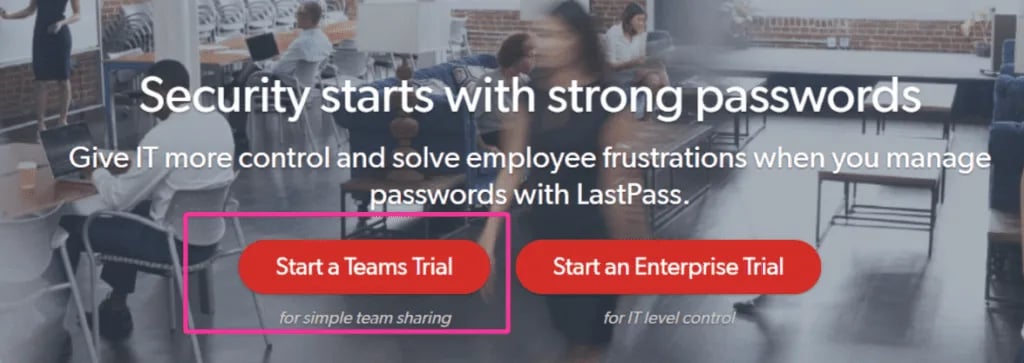
- Go to LastPass.com;
- Click on the “Start a Team Trial” button.
- Sign up for a LastPass Teams account by entering your email and selecting the estimated number of users from the drop-down menu. Click on “Start My Free Trial”;
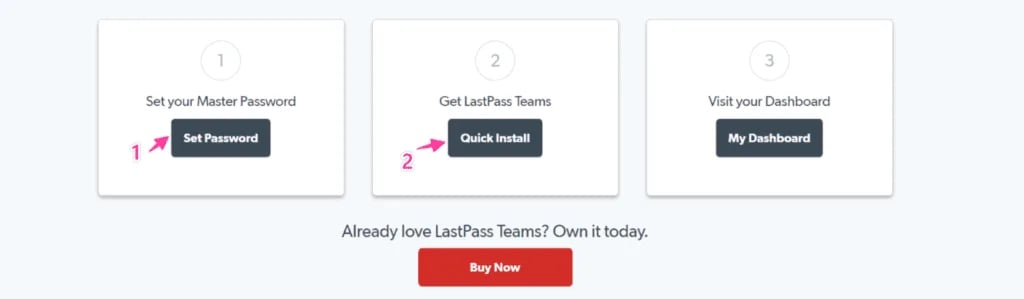
- Set a Master Password. If you want to learn more about creating secure passwords, read this guide from MakeUseOf;
- At this point, you can decide to skip the 14-day free trial LastPass is offering you or click on the “Buy Now” button.
- Install the LastPass Chrome plugin by clicking on “Quick Install” under “Get LastPass Teams”. This is not optional—you have to do it to get the most out of your LastPass account;
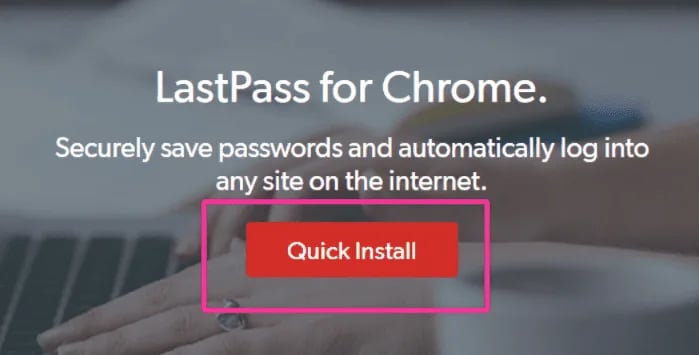
- Once you click on “Quick Install”, a new tab will open in your browser. Click on “Quick Install” here as well;
- A pop-up will ask you if you want to add the LastPass browser extension. Click on “Add Extension”. You will be notified when the installation is complete;
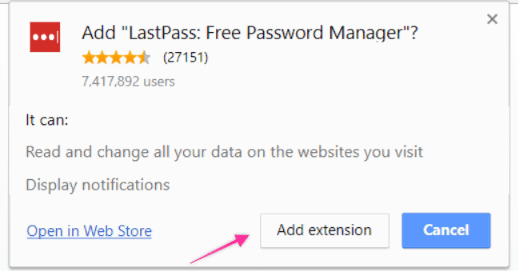
- Login to your LastPass plug-in by clicking on the LastPass icon in your plug-in toolbar.

6. Create a Google Sheet where you put all your logins (both personal and professional). You will eventually delete this, of course, but it’s a good way to collect all of your online accounts. Be patient with this—we all use a lot of accounts on the Internet, so it’s normal that you spend a bit of time remembering and collecting all of them;
7. Change your old account passwords using this procedure:
- Go to that respective LastPass account;
- Enter your old password (from the Google Sheet you have just created);
- Go to the option that allows you to change your password. All accounts have this option and it’s usually somewhere in the “ Account Settings” menu;
- Click on the little LastPass logo in your plug-in bar, and then click on the “Generate Secure Password” option to use their password generator;
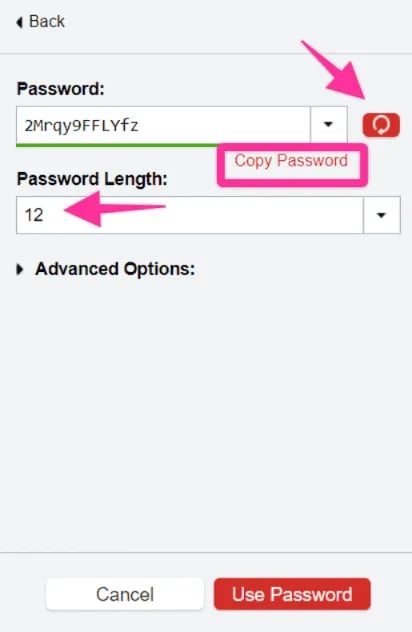
- Select the length you want for your password. Remember that weak passwords are generally quite short – so you might want a longer password here.
- Click “Copy Password” if you’re OK with what has been generated. If not, you can always click the little red “Refresh” button.
- Paste your new password into the respective account field. In most cases, you will have to do this a second time as well (in the “Re-type/confirm your password field”).
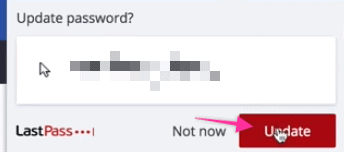
- You will see a LastPass pop-up notification asking if you want to update the password. Click on “Update”. This will save the account and password in your LastPass vault.
Adding New & Future Accounts
Saving new accounts on LastPass is pretty much similar to updating the old ones:
- Go to the sign-up section of the account you are creating and enter all the necessary details;
- In the password field, you may see a little LastPass icon. Clicking on this will generate a password for you. If LastPass hasn’t detected the password field, you can generate a new password by simply going to your LastPass plugin → “Generate Secure Password” and following the same procedure as above;
- Once you finish the signup procedure on your new account, you will see a LastPass pop-up asking if you want to add this new account to your LastPass. Go ahead and click on that—your new account and password will be added to the password vault.
Sharing Passwords With Your Team
Using LastPass also allows you to share all your credentials with people on your team. To do this, follow these steps:
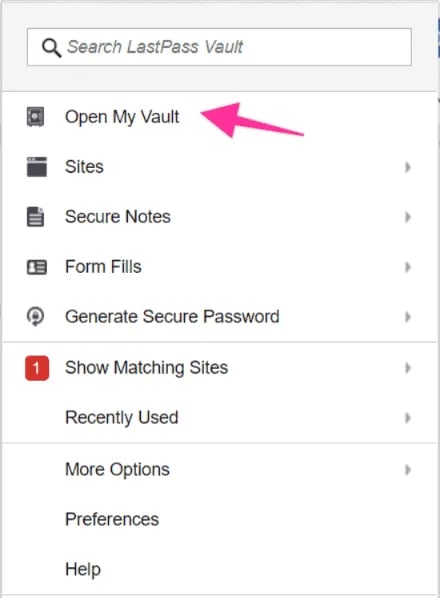
- Click on the LastPass plug-in icon;
- Click on “Open My Vault”;
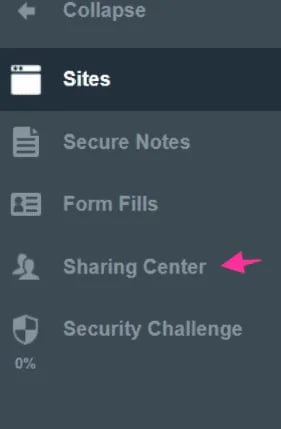
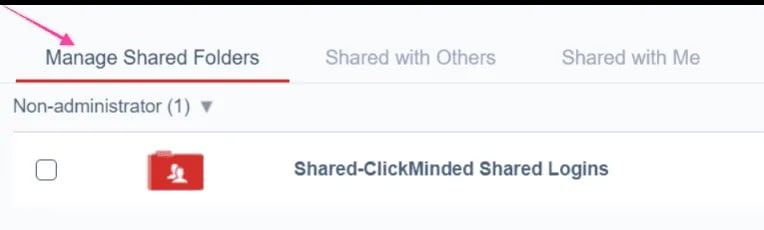
- Click on “Sharing Center” in the left-hand menu;
- Click on “Manage Shared Folders”;
- Click on the little “+” sign on the bottom right-hand side of the screen;

- Create a new shared folder and name it;
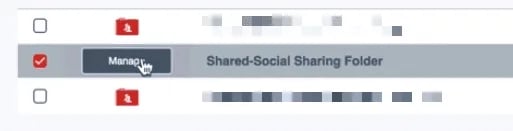
- To manage your new folder, hover your mouse over it and click “Manage”;
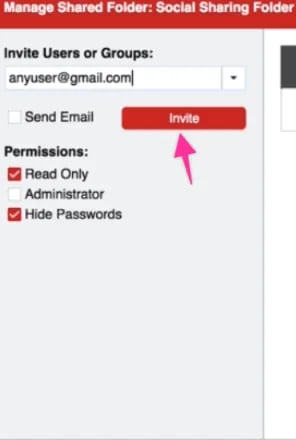
- To invite a team member, enter their email in the “Invite Users or Groups” field and click “Invite”;
- You can also select different levels of permission you want to grant a new user (“Administrator”, “Read-Only”, and “Hide Passwords”).
- Keep in mind, regardless of the type of permission you will grant your team, someone who has even a small understanding of HTML will be able to see the actual password. Therefore, this is not 100% safe if you absolutely want to make sure your staff doesn’t see your account passwords.
- To add accounts to your newly created folder, go to “Sites” in the left-hand menu and simply drag and drop the sites you want in your new folder.
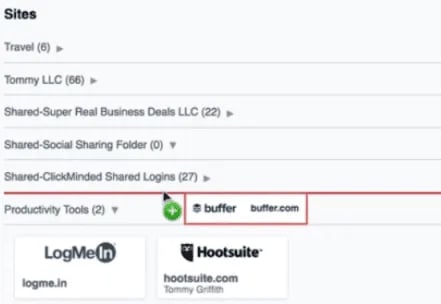
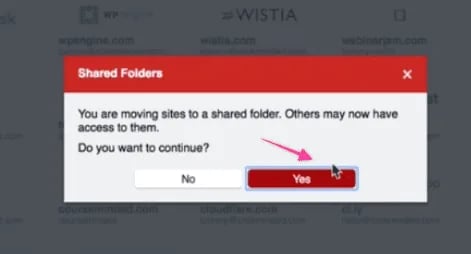
- Click “Yes” on the pop-up asking you if you want to move this site to a shared folder.
In Conclusion
That’s it! That’s all you need to know to get started with password management for your business or even personal use! Not only will this be a complete life-changer, but it will also help you autofill your passwords, and manage all of your passwords and accounts more securely, regardless of whether you are on Android, ios, Microsoft Windows, Apple, Linux, or any other mobile device or non-mobile device. You can also use LastPass mobile app with a fingerprint security lock to quickly and safely access your passwords.
Note: Even with a Password Manager or authenticator, it is more secure to use two-factor authentication for higher security.