Imagine having no data to analyze and creating business strategies only on a hunch.
The thought itself is scary.
Google Analytics is a gift to all digital marketers who love data. And with Google Analytics 4, Google has just made life a lot easier for us.
GA4 is exceptional with new features that help you track market trends and customer behavior on web domains, mobile apps, and offline APIs.
The new data modeling feature that uses AI makes GA4 the tool no one should miss out on.
GA4 is used by over 28 million websites on the internet. It’s time for you to take your right foot ahead and start setting up GA4 for your website and mobile apps.
In this walkthrough, I’ll tell you how to properly set up GA4 for WordPress, Shopify, and Squarespace websites to run Google ads backed with advanced demographics, users, bounce rate, page views, and other metrics.
But before that, let’s understand what is GA4 and how is it different from its predecessor.
Google Analytics 4 Vs Universal Analytics
Google calls the GA4 upgrade, the next generation of Google Analytics with several advantages over Universal Analytics. It is the next revolution in terms of data analytics.
With new google analytics, you can measure cross-channel data meaning that now you can track users across apps, software, and websites.
This way you can inform potential customers about products and services and increase customer retention in no time. You will have real-time reports from GA4 telling you where your visitors are coming from, what are their interests, and event tracking to know where your customers are clicking on the website, and how to turn them into customers.
Since it has AI as the main form of data analysis, you can now successfully extrapolate from existing data and analyze site traffic and user behavior.
So if you want to comprehensively understand users across devices, set up GA4 and let it do its magic.
How to Setup a GA4 Account?
In order to set up a GA4 account, you need to have an existing Google account. If you don’t have one, then you can create new google analytics here.
- Sign in to your Google account at https://analytics.google.com
- The following depends if you have an existing Google Analytics account.
- If you have an existing Google Analytics account (e.g. Universal Analytics), select Admin ➞ Create a new account.
- If you don’t have an existing Google Analytics account. Click “Start measuring”.
- On the account setup page, add an Account name and click Next.
4. In the new GA4 property setup, add a name for your property. The property name should be the name of your website or mobile app. Then click “Next”.
- Fill in the rest of your business details and click “Create”.
- Industry category — The niche that your business is in.
- Business size — How many employees do you have including yourself?
- How do you intend to use Google Analytics — What purposes will you use Google Analytics for?
- Accept Google Analytics’ terms of service agreement.
- Save your email communication settings for Google Analytics.
- You will then be presented with a dashboard to set up google analytics 4 property and data stream. Data stream basically means analytics data for your website or app. There are three platforms you can set up a data stream for:
- A website
- An android app
- An iOS app.
- Choose one that’s most applicable to you. But for this tutorial, we’ll choose Web.
- Add your website URL and add a name for this data stream to help you identify this data. Leave the enhanced measurement enabled by default. Then click “Create stream”.
- You will then see a summary page of the data stream for your site. That means you have successfully created a Google Analytics 4 account.
Woohoo!
Now, I’m gonna tell you how to set up GA4 for the data collection on your WordPress, Shopify, and Squarespace websites.
So, let’s go!
Google Analytics 4 Set up for WordPress using Google Tag Manager
Get the Measurement ID from Google Analytics
- Log in to your Google Analytics account.
- Click “Admin”.
- Make sure you’ve selected the correct GA4 property (website) and select “Data Streams”.
- Select the website that you want to implement Google Analytics 4.
- Click on the measurement ID to copy it to your clipboard.
- You can paste it into a text editor or notepad. You will need this later on.
Set up Google Analytics 4 using Google Tag Manager
- Sign in to your account at http://tagmanager.google.com.
- Select the container that is set up on your website.
- Go to “Tags”:
- Click on “New” and rename your tag.
- Click on the “Tag Configuration” section → Select “Google Analytics 4 configuration”:
- Paste the Measurement ID that you copied from Google Analytics earlier.
- Next, click on the Trigger icon to set up a trigger for this tag.
- Select “All Pages”. This is to fire the Google Analytics 4 on all pages on your website (recommended).
- You are now ready to save your settings by clicking on “Save”:
- If you now click on “Overview” on the sidebar, this is how your GTM overview dashboard should look like:
- If everything looks ok, you are now ready to hit “Submit”
12. In the Submission Configuration panel, you will be given the chance to add a name and description to this version. After you have done so, hit “Publish”.
- You have successfully created your GA4 tag.
Set Up GTM on WordPress
You can either manually add GTM code on your WordPress site or use a plugin to do so but here I will demonstrate the manual approach. Follow the below steps to embed the GTM code on WordPress:
- Once you’re done with creating the tag, close the container.
- Click on the GTM Code starting with GTM- on the navbar.
- A popup will appear with two snippets of codes as shown in the snapshot.
- Click on the topmost copy icon on the right, the snippet will be highlighted in blue denoting the code that has been copied.
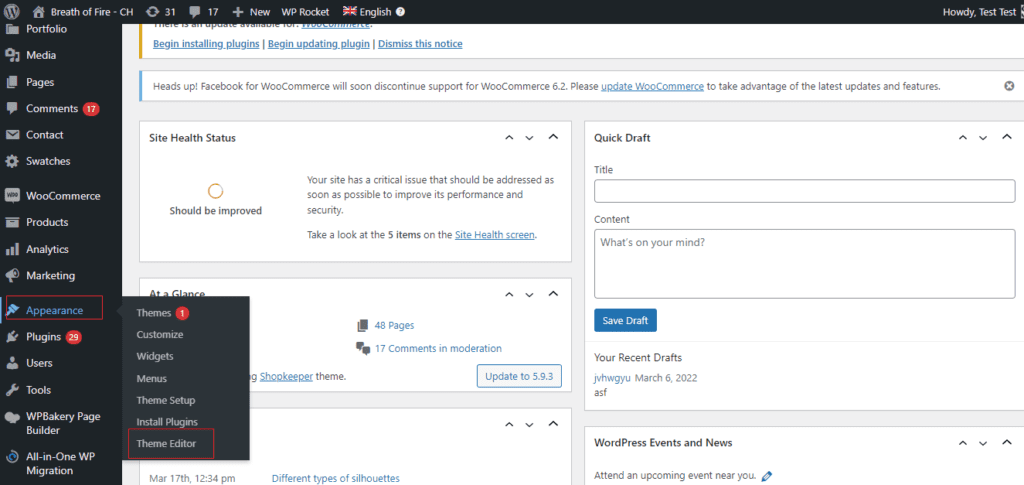
- Now go to the website backend and scroll down to Appearance then click on theme editor.
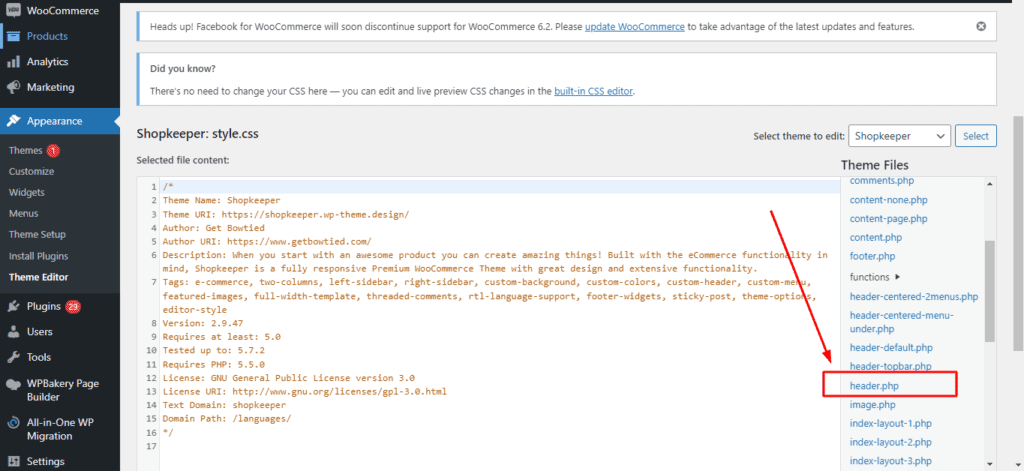
- Find the header.php file on the right panel of the screen and open it.
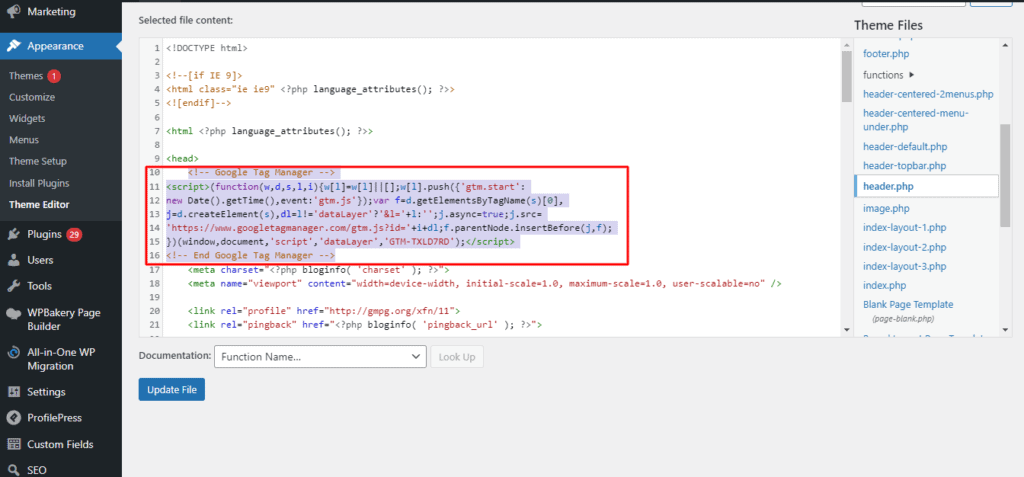
- As guided above in the snippet preview of GTM code, paste the copied code right below the opening of the <head> tag.
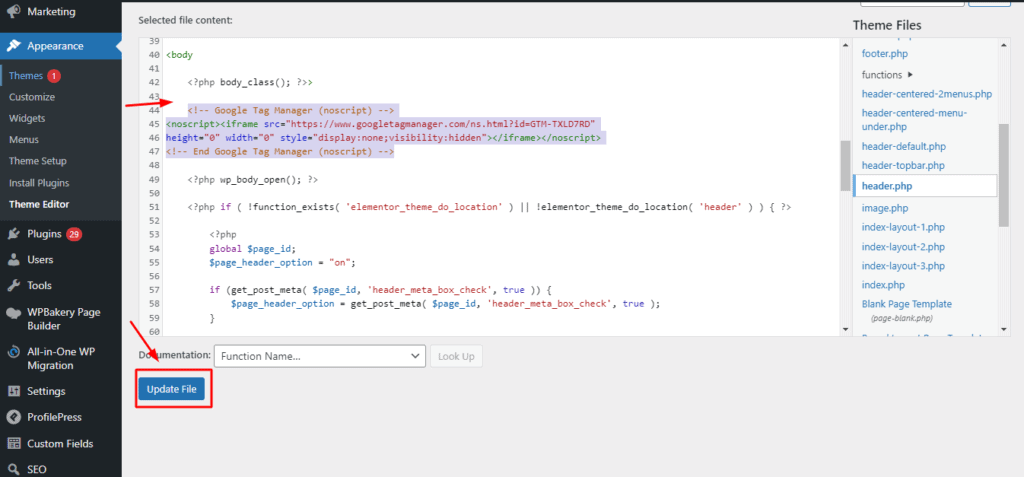
- Switch and go back to the GTM window and copy the second code snippet just like you copied the first one.
- Now come back to the backend. Scroll down and add the code you just copied right below the opening of the <body> tag and hit the update file button.
- Woohoo. You’ve successfully set up GTM code on your WordPress site. Now you can easily track Google Analytics 4 data of your site using the Google Tag Manager. Cheers!
Set Up Google Analytics 4 for Shopify
To get your GA4 tracking code, follow the below steps:
- Login to your Google Analytics account. Click Admin and create a property (website) and select “Data Streams”.
- Select your website and click on “Global site tag”.
- Copy the Google Analytics 4 tracking code. You will need this later.
Now add the Google Analytics tracking code to your Shopify Store.
- Log in to your Shopify store.
- On your Shopify Admin Panel, click “Online Store” → “Preferences” → You will find an input box to enter your Google Analytics code:
- Paste your Google Analytics 4 tracking code (that you copied earlier) and click “Save”
That’s it! You’re now tracking your Shopify Store with Google Analytics.
Google Analytics 4 Set Up for Squarespace
To get your GA4 tracking code, follow the same steps as for WordPress.
Now, copy the measurement id and follow the below steps:
- Login to your SquareSpace account and select a site to edit.
- In your site dashboard, select “Settings”.
- Then, in the site settings, select “Advanced” ➞ “External API Keys”.
- Paste the Google Analytics tracking ID that you copied earlier into GOOGLE ANALYTICS and hit Save.
- You’ve now added Google Analytics 4 to Squarespace!
In Conclusion
If you have followed this complete guide step-by-step as mentioned for your website, you can now successfully upgrade to Google Analytics 4 for your website.
Here are some additional resources that might be helpful:
- How to Add Google Analytics to WordPress: A Beginner’s Guide
- How to Add Google Analytics to SquareSpace: A Beginner’s Guide
- How to Add Google Analytics to Shopify: A Beginner’s Guide
- Google Analytics 4 vs Universal Analytics – Root & Branch
- Transition your Team & Clients to Google Analytics 4 by Sending ONE Email
- Setup Perfect Google Analytics 4 Tracking


