


Learn how to easily install social media share buttons on your WordPress site, so your visitors can share your content on their social channels.
There are a ton of reasons why you would want to add social media buttons to the WordPress website – but the most important one is that social sharing links or social sharing buttons make it easy for everyone to share their content with their peers on social media platforms.
Adding social sharing icons to your website is actually a pretty simple process, as you will see further in this tutorial.
There are two major steps you need to take to add social sharing icons to your WordPress site:
- Installing the free WordPress plugin Sumo on your site (using Google Tag Manager),
- Adding social media sharing links to your site.
So, let’s get down to action.
Installing Sumo using Google Tag Manager
This should take only about 15 to 30 minutes. Let’s do a high-level overview of how we’re going to get this done:
- The goal: Installing social sharing plugin Sumo to your WordPress website, using Google Tag Manager, so that you can later use it to add links to your social media accounts on your website.
- The ideal outcome: To successfully install the share plugin and add social media accounts to your WordPress theme without technical difficulties.
- The prerequisites: We chose to do this using Google Tag Manager – not because we want to torment you taking a long way, but because it’s actually better in the long run—it will help you to manage all your third-party tracking in one place. So, that being said, you need to have Google Tag Manager set up and going before proceeding with Sumo and the social sharing links. If you haven’t done this already, here’s how to install GTM on your WordPress site. Oh, and you also need a Sumo account. You can create that here (affiliate link).
- The importance of this action: WordPress social media plugin Sumo offers A LOT of cool features that will help you really, really make the most of your website traffic and the option to add links to your social media profiles is just one of them. Sumo is one of the best WordPress plugins for sharing and engagement. You will love Sumo, I promise.
- Where this is done: You’ll do this on your WordPress website and Sumo.com.
- When this is done: Once (cue party sounds here). But you really have to do it now, you’re missing out on all the Sumo fun if you don’t do it now.
- Who does this: Whoever is responsible for managing your website, your Analytics, your growth marketing – and, if you’re a small team, that person could just as well be you.
Get This Entire Walkthrough and All the Resources in This Post
Creating the Sumo account and installing it on your WordPress website
As mentioned above, you will need a Sumo account to install it on your WordPress website. To make sure you do this via Google Tag Manager, it’s very important to pay attention to the way you create your Sumo account. Here are the things you need to do:
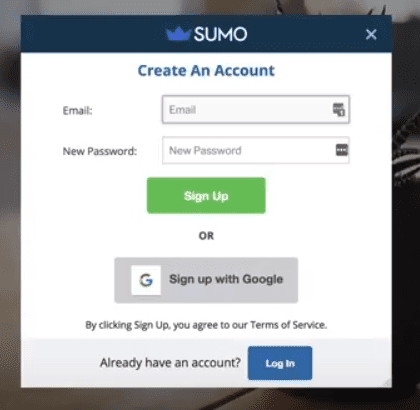
- Go to Sumo.com.
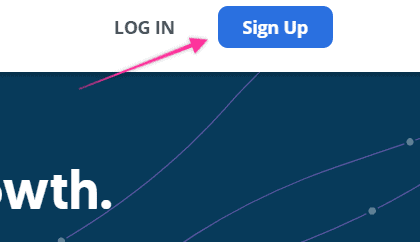
- Click on “Sign Up” to add a new account (blue button on the header section of the site).
- Fill in the form on-screen (site address, email address, new password).
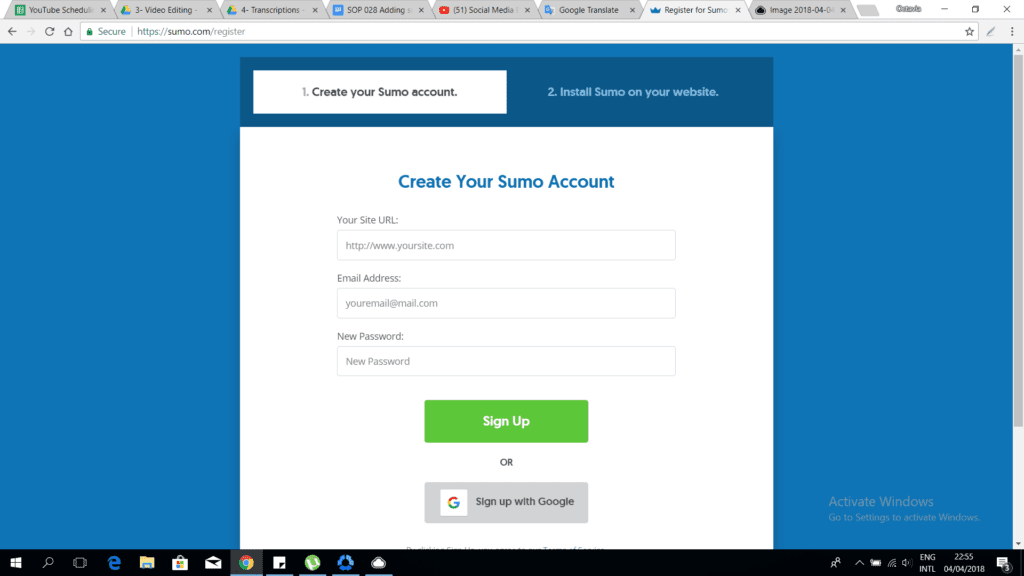
- If this is your first time on Sumo, you will see a prompt on the screen saying “Hey, it looks like you’re using WordPress, add your login credentials here and we’ll do it for you”. This is the part you should not do. Cancel out of that and you’ll be led to a screen like this:
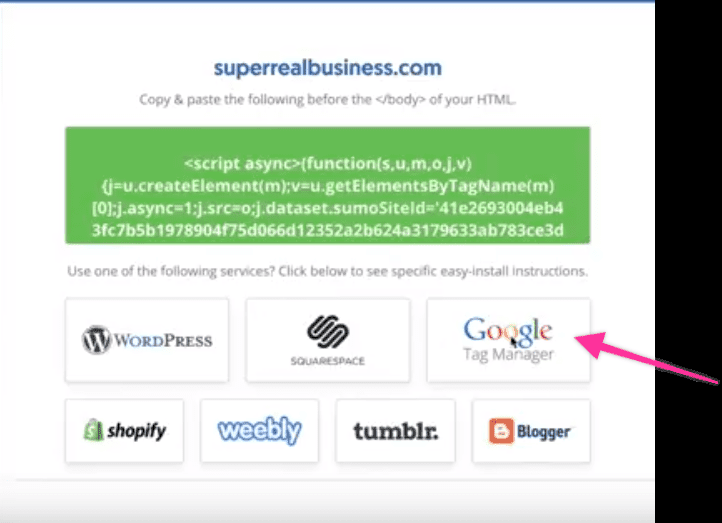
- Click on “Google Tag Manager”.
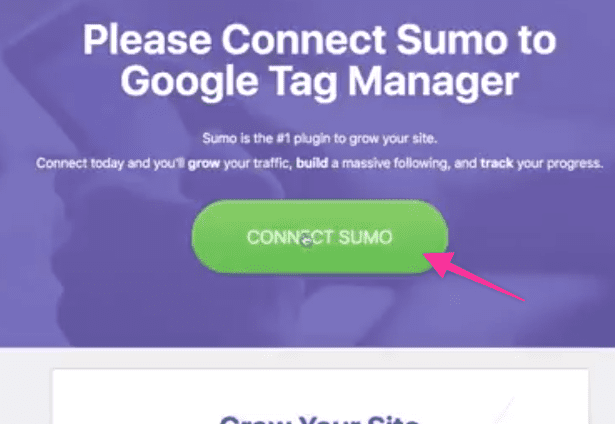
- Click on “Connect Sumo”.
- Choose your Google account and log in.
- Once you have connected Sumo with Google Tag Manager, you will see a big green button saying “Install Sumo”. Go ahead and click on that.
- Go back to your website home page, refresh the page, and you should see Sumo installed there.
- If you don’t see it, go back to Sumo, log out, and then log back in, entering your username and password. Go back to your website and take a look to see if Sumo is installed.
- If that didn’t work either, your badge may be hidden. In this case, go to your WordPress website, type “S-U-M-O” and press the up arrow key. This will prompt a login pop-up – go ahead, log in from there, and you should now be able to see Sumo free plugin installed on your site.
- You can change the location of the Sumo badge on your website. Click on the badge, click on the top-right arrow → Badge → Badge location drop-down menu:
- Top Left
- Top Right
- Bottom Left
- Bottom Down
- Hidden
Click “Save” once you have picked your option.
Adding Social Sharing Links to Your WordPress Website
Once you have installed Sumo, you will be able to easily add social sharing buttons to your website. It shouldn’t take more than 10 minutes, and the goals here are:
- The goal: to add social media buttons to WordPress website.
- The ideal outcome: your visitors will easily share content from your website to their social networks, using the social buttons you have installed.
- The prerequisites: To have Sumo installed – which you have already done.
- The importance of this action: Social media sharing links are crucial for your website’s success – and allowing users to do this with ease is very, very important. The easier it is, the more likely it is that users will click the “share” buttons.
- Where this is done: Your WordPress website and your Sumo account.
- When this is done: Once for every website you create.
- Who does this: The person who manages your website, your web developer – or you.
Okay, so let’s do this:
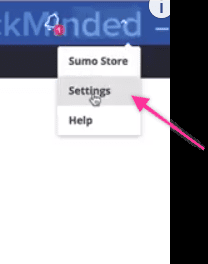
- Log into Sumo via your website dashboard.
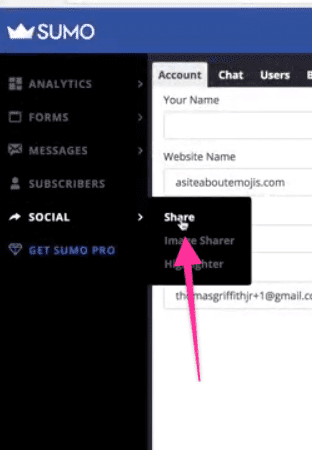
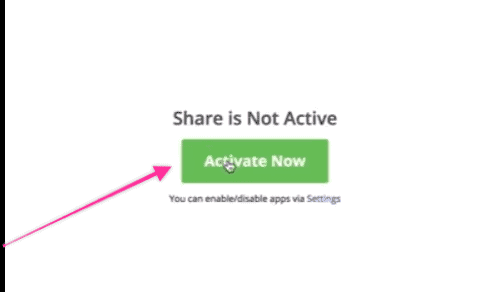
- Go to the left-hand side menu and click “Social” → “Share” → “Activate Now” (green button in the center of the screen).
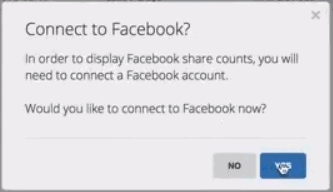
- A pop-up will appear, asking you if you want to connect to Facebook. Click “Yes”.
- Click on “Services” in the upper side of the screen and add your Twitter handle as well.
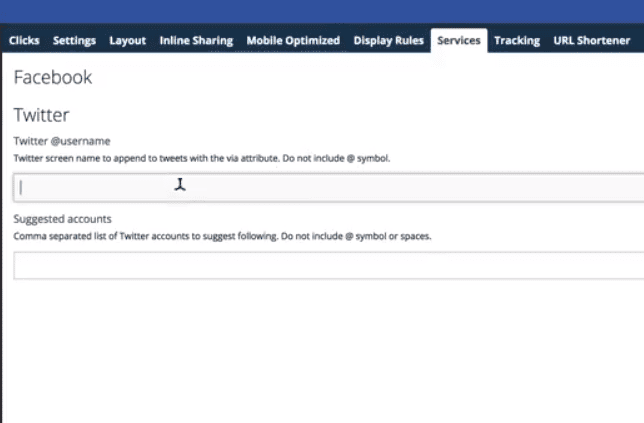
- Click “Save” once you’ve done that.
- If you don’t use Facebook or Twitter for your website, you can just ignore these. You can also add them later if you want.
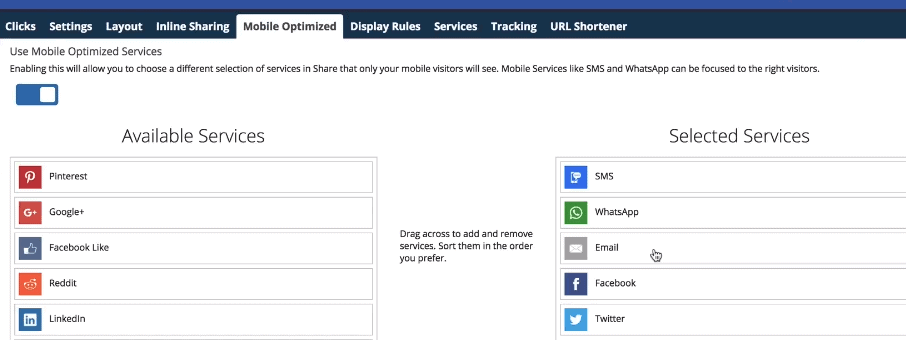
- Go to “Settings”. This is the admin area where Sumo allows you to add more social sharing buttons to your website, according to the social media networks (LinkedIn, Instagram, TikTok, etc.) you use and/or are relevant to your business.
In the left column, you will see all the available services. In the right column, you will see all the services you have selected. To add or remove a button to/from your site, simply drag and drop the respective service across (drag it to the “Selected Services” column if you want to add it, drag it back to the “Available Services” if you want to remove it).
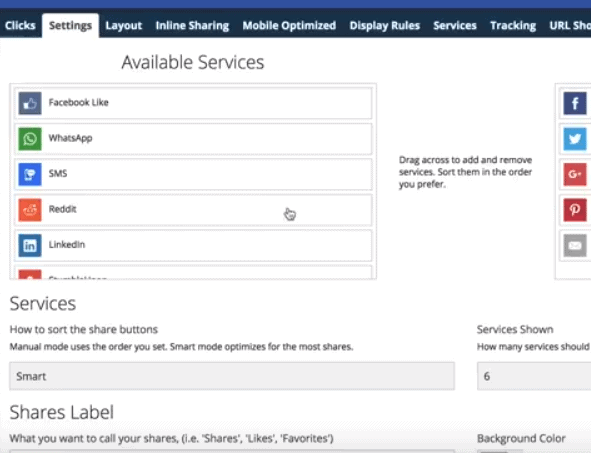
- You can also move around the “Selected Services” in the order of their importance. So, if you find Facebook to be the most relevant social network in your industry, niche, or simply for your brand, drag and drop it at the top of the list. If you find Twitter to be the sixth most important, drag it to that position in the list.
- Under these lists, you will find a “Services” section with a drop-down menu. You can use this to select the way the social media share buttons are arranged in the list (respectively, how they are arranged on the front end of your website).
- Manual: dragging them yourself, as explained above;
- Smart: Sumo will automatically detect if the user is logged into their social network profiles and prioritize the buttons according to that. Impressive, right?
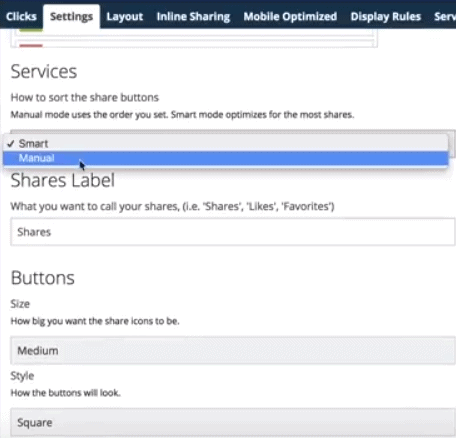
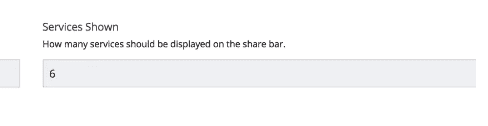
- The “Services shown” section allows you to control how many of your selected services will be actually visible on your website.
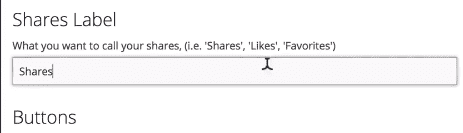
- The “Shares Label” section allows you to decide whether or not you want your social icon widgets to have a name – and if yes, what that may be (“Likes”, “Favorites”, etc).
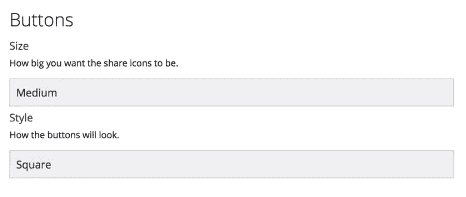
- The “Buttons” section allows you to adjust the button styles – to configure the size of the buttons (small, medium, large), as well as the shape of the social media icons (round, square, etc.).
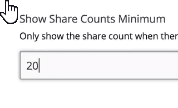
- The “Total Share Counts Minimum” section (available under “Share Counts”, on the right side of the screen) allows you to display the number of shares that have happened thanks to Google Analytics integration – but only when their number is larger than a number you specify. In general, I like leaving this at 20, maybe 25 – setting a very high goal here might mean the shares won’t show while setting a goal that’s too low might send across the wrong message (e.g. If people see you only have one or two shares).
- I generally leave all of these settings at their default state. Sumo does a fantastic job with their defaults—except for the share minimum, which I always edit.
- Also, try not to add too many social media links to your website. There’s no issue from a technical point of view if you do this, but it might be too much and too confusing for your users. Most of the time, I like to keep around 3 social sharing buttons, up to a maximum of 6. There’s really no need to go beyond the popular social networks – and, if that’s the case, the social networks that are suitable for your business.
- Once you are done with the customization of all your social media buttons, click “Save”.
- Go to “Mobile Optimized” in the header menu bar. This is very important because a lot of users will access your website from mobile devices. Click on “Enable” here if you want Sumo to detect if users are on mobile devices when they access your site so that it can show them sharing services specific to this (i.e. WhatsApp, SMS, and so on). Once you have enabled this, click “Save” again.
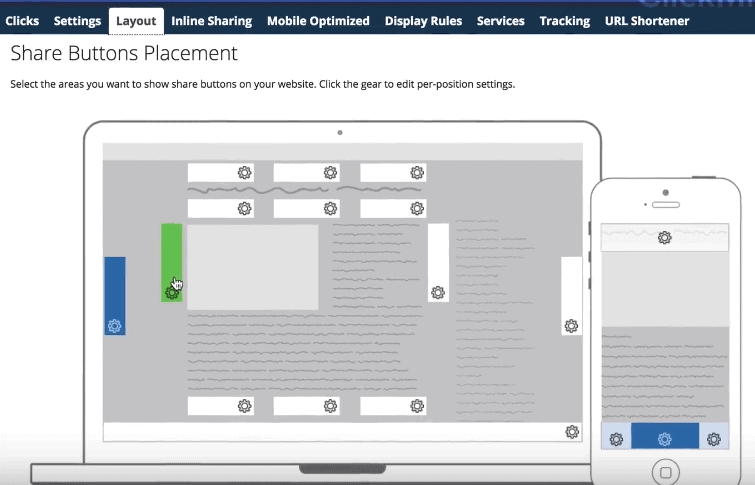
- Go to “Layout” to decide where all of the sharing options will show up (on the desktop version of your site, as well as on the mobile one). I usually like the defaults here, which are on the sidebar, but if you think the buttons would look better in other spots on the page, select those from the options they give you on the layout simulation.
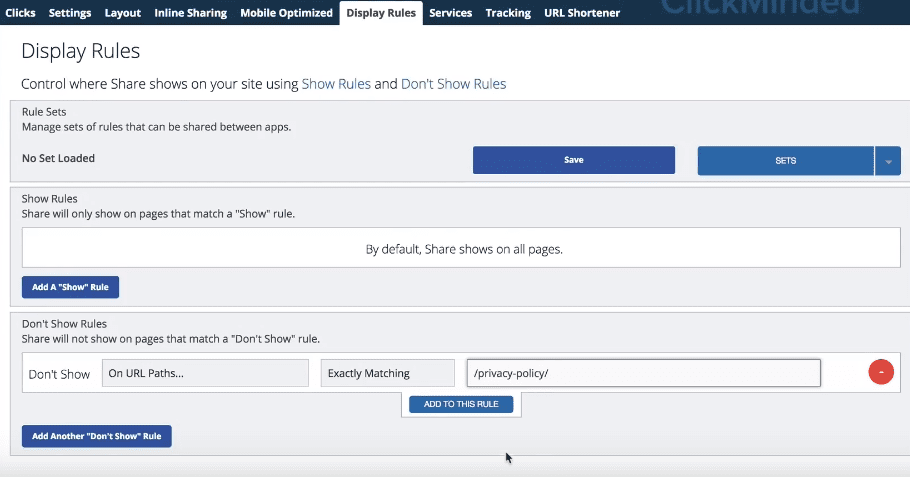
- Go to “Display rules”. Setting this up is also very important because sometimes, it doesn’t make sense to add sharing buttons to some types of pages and it might even hurt your business goals (e.g. There’s no point in sharing a login page or a checkout page – right?). Remove the pages that don’t make sense to have links to social media sites on them.
- You can set up “Show” or “Don’t Show” rules. Once you click on “Add A Show Rule” or on “Add a “Don’t Show Rule”, a drop-down list of options will appear (depending on whether you are using the free version or you’re on the paid Sumo plan, this list may be longer or shorter). Select the rule you want to add, select the match type, enter the rule per se, then click the “Save” button. For instance, you could select “On URL paths”, select “Exactly Matching” and then add “/privacy-policy/” as the rule.
- “Rule Sets” are groups of “Show” or “Don’t Show” rules you can save and reuse later when you need them (so that you don’t have to go through the same process of adding them every time). You will find these sets above the “Show Rules” section of “Display Rules”.
As you can see, Sumo offers a lot of options for you to customize the types of buttons that are shown on your website, where they are shown when they are shown, and how they are shown – so play around with the functionalities and find the configuration that suits your business!
Don’t forget to click the “Save” button once you’ve implemented any kind of change.
And that’s it, you’ve successfully installed Sumo and added social sharing links to your site, allowing all your site visitors to easily share your content with a single click!

