Technical SEO is the process of managing and optimizing all the things we do behind the scenes on our website to make it easier for search engines to find our pages.
When we do technical optimization on a website, there are several primary categories we want to focus on.
We’ll cover all of the elements in this technical SEO checklist:
1) Crawling & Indexing
The starting point of technical optimization is indexation.
Indexation, or indexing, is just a fancy way to say, “helping Google find all of your pages.”
Google’s index is the complete list of all the pages that it knows about and is willing to show users when they search.
If your new page is not in the index, you will not show up.
However, getting into the index and then never worrying about it again is not a good strategy.
Anytime you make a change to a page, you want Google to know about it so it can incorporate those changes into where you rank.
There are many automated SEO tools and tactics we can use to make Google crawlers crawl as many of our pages as possible every day.
In general, the larger your site is, the more you should worry about this.
If your site is less than 100 pages, this is not something you should focus on.
Crawl Path Optimization
Optimizing indexation is a larger opportunity for larger websites. This process is called crawl path optimization.
We focus on crawl path optimization when working on a large site because crawling has a cost.
Just like a restaurant, e-commerce, retailer, or farm, there are operational expenses associated with crawling.
When Google crawls your site, you’re generally given a “crawl budget.” The larger your budget, the more pages Google will crawl.
The more pages Google crawls, the more they will index, rank, and receive organic traffic (and sales).
On larger sites, you can tie crawl path optimization to bottom-line profit.
That’s why larger sites should consider looking at this.
There are several decisions you should make before starting crawl path optimization.
First, how many pages do you have that you want to be indexed in Google?
- Do I have less than 100 good pages?
If yes, just make sure your pages are indexed.
- Do I have 100 to 10,000 good pages?
If yes, do a one-time crawl path optimization SEO audit.
- Do I have 10,000+ good pages?
If yes, consider optimizing and actively monitoring this.
Do not try to index every single page on your site. Focus on indexing pages that are good for new and returning users.
Do not index:
- Privacy policy, terms of service, or duplicate content
- Pages behind a login, contact forms, or shopping carts
- Pages not good for new visitors with high bounce rates
- Pages with technical issues (404s, infinite redirects, etc.)
Followed Links & Indexed Pages
If you’ve decided to optimize your crawl budget, let’s talk about ways to do that.
There are technical changes we can make to optimize where search engines’ algorithm spend their time.
Index: Tells search engines to index a page (default, not required).
Follow: Tells search engines to follow links and pass authority (default, not required).
Noindex: Tells search engines not to index.
Nofollow: Tells search engines not to follow links or pass authority.
For more information on this, check out Moz’s Meta Robots Directives.
XML Sitemaps
Next, let’s talk about XML sitemaps.
An XML sitemap is just a text file that contains all the URLs on your website that you want Google to know about.
You submit the location of your sitemap one time via Google Search Console, and Google will come back every day to check it for updates.
If you’re using a modern CMS, they’ll usually generate an XML sitemap for you.
If not, there are often free SEO plugins that will.
If you’re on WordPress, Yoast SEO has this feature included.
If you’re not on WordPress, you can check out Search Engine Journal’s article on how to set up and optimize XML sitemaps.
Robots.txt
Your robots.txt file is another important part of managing your crawl budget.
Robots.txt is a simple text file that tells bots, both search engines and other crawlers, what folders they can and can’t access.
You can make specific rules for specific folders and files, as well as specific search engines, using “allow” and “disallow”.
All pages and subfolders are “allow” by default.
You can also add your XML sitemap to your robots.txt file.
This gives search engines a good idea of what pages you want crawled and what pages you want skipped.
- Meta robots noindex: Don’t index this page
- Meta robots nofollow: Don’t crawl these links
- Robots disallow: Don’t crawl these pages
You can use one, two, or all three of these directives to manipulate and optimize your crawl budget.
Google has changed its policy and declared that “nofollow” is now a hint, not a directive.
This means that links can be crawled, indexed, and pass authority, even if they are “nofollow.”
You should not rely on “nofollow.” Use NOINDEX and Robot.txt disallow for better coverage.
You can check out Neil Patel’s article on how to create the perfect Robots.txt file for SEO.
2) Crawl Errors & Redirects
Common Server Response Codes
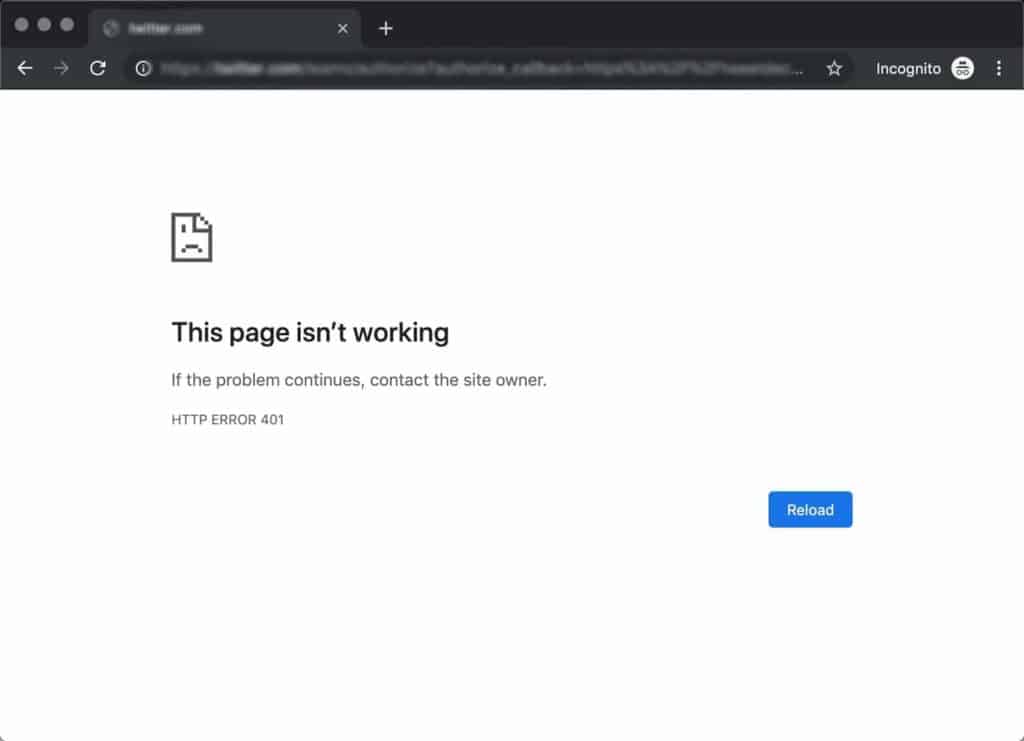
When you type Facebook.com into your browser, you, the client, are making a request to Facebook, the server.
You make a request, and the server responds. You make this request using the HTTP protocol.
Status codes let us know whether the request was a success, a failure, or something in-between.
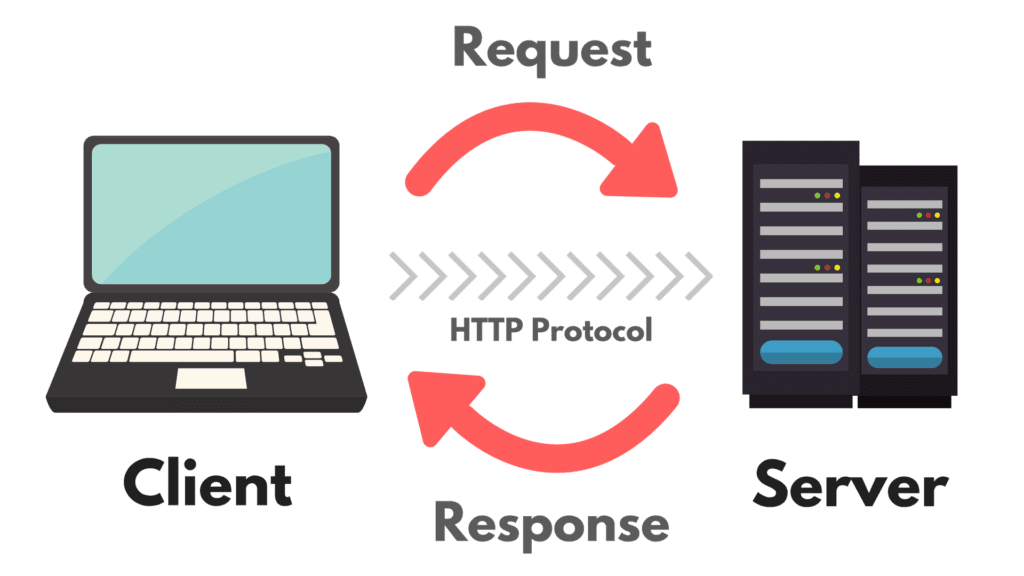
Here are the most common codes you’ll see in digital marketing:
- HTTP Status Code 200: Success
- HTTP Status Code 301: Moved Permanently
- HTTP Status Code 302: Found
- HTTP Status Code 304: Not Modified
- HTTP Status Code 404: Not Found
- HTTP Status Code 429: Too Many Requests
- HTTP Status Code 500: Internal Server Error
- HTTP Status Code 503: Server Unavailable
- 301 Redirects
To learn more, go through our resource on HTTP Status Codes Explained.
Keyword Cannibalization
If you’re evaluating a site’s SEO for the first time, keyword cannibalization is one of the best places to start.
Keyword cannibalization happens when multiple pages on our site are targeting and or ranking for the same keyword.
This can happen unintentionally, and it’s very common if you’ve spent months or years creating quality content.
There are a number of reasons why this is bad.
It can drop authority and rankings: If two pages rank for a keyword, you’ll acquire links slowly on two separate pages instead of consolidating to just one, which can keep search rankings lower for both pages.
It can hurt conversion rates: Older pages that receive traffic that you never intended on ranking will often convert at a much lower rate than newer pages you’ve written intentionally.
There are a few ways to fix cannibalization:
- Merge the pages together and use a 301 redirect
- Modify the cannibalizing page for another keyword
- Noindex or delete the page (if there are no links)
Internal Links & Crawl Depth
Crawling the Internet has a cost. Google allocate to your site a crawl budget.
The easier (read: cheaper) it is to find your pages, the more likely it is your pages will index and rank.
The rule of thumb is the “three-click rule.” Can search engines get to every page on your site within three clicks from your homepage?
We make it easier for Google to find all our pages when we keep them well-linked and as few hops from the homepage as possible.
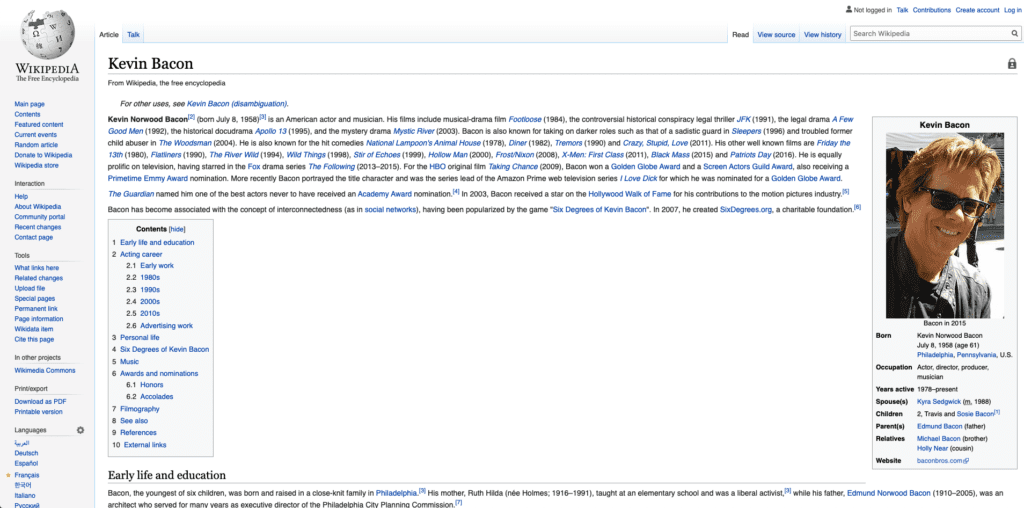
 A great way to understand thorough, comprehensive internal linking is to look at Wikipedia.
3) Site Speed
Back in 2010, Google came out and said that site speed was a ranking factor.
Fast sites will rank higher, and slow sites will rank lower.
In 2018, Google came out and said that mobile site speed was a ranking factor.
Fast mobile sites will rank higher, slow mobile sites will rank lower.
Google has changed its wording on this over the years from a concrete recommendation to something more open to interpretation.
Many SEOs were very skeptical of Google when this was announced because a faster web is better (and cheaper) for Google.
Most people still did the work to improve their site speed because faster sites are generally a better user experience.
Today, there are experiments showing that speed has very little impact on Google rankings.
You shouldn’t speed up your pages just for SERPs, it should be for user experience.
Here are some ways to speed up your site:
Caching
One of the best ways to speed up your site is through caching.
Caching is the act of storing copies of files so that they can be accessed more quickly.
There are 2 main types of caching that are important to digital marketing.
Browser caching and server caching.
(there’s another type, web page caching, where files are stored on unused RAM, but this is not important at the moment)
Browser cache: Storing copies of certain files on the user’s computer, so they can be accessed quickly.
Server cache: Storing copies of certain files on the site’s strategically placed servers to be accessed quickly.
Most people choose a 3rd party service such as CloudFlare to handle their website’s server caching.
Besides caching, there are other things you can do to speed up the delivery of your content.
Many popular CMS platforms either offer this feature or have plugins that do the work for you.
Make sure to check for a plugin that does the hard work for you before doing anything manually.
Enable Compression
Use Gzip to reduce the size of files by up to 70%, which increases their transfer speed significantly.
Impact: High
Minify CSS, JavaScript, and HTML
Eliminate unnecessary bytes, like extra spaces, line breaks, and indentation. Speed up downloading, parsing, and execution by making your code compact.
Impact: High
Minimize Redirects
Every unnecessary redirect adds wait time for your user.
Impact: High
Optimize Images
Reduce load times by reducing the size of images. Compress before uploading and use JPG for photographs and PNG for graphics.
Impact: High
Many people go down the rabbit hole of site speed and spend weeks fine-tuning their website with zero results (myself included!).
If you’re going to work on this, it should be clear to you that a slow site is hurting your conversion rate.
Don’t do this for an improvement in rankings.
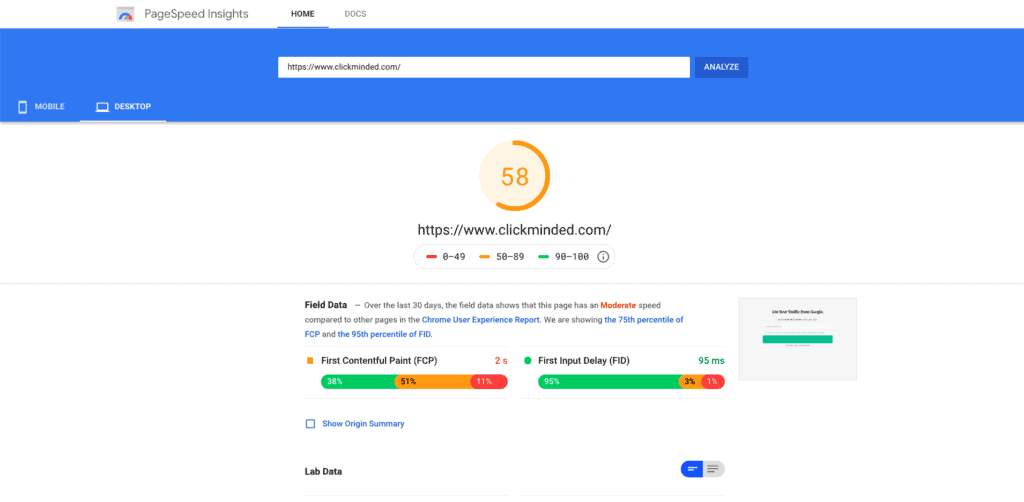
With that said, if you still want to work on this, here’s my recommendation:
- Put your three highest-traffic pages into the Google Page speed tool
- Look for obvious things you can easily fix (images not compressed, multiple redirects, no caching)
- Spend 1 hour (max) fixing things, then move on
Do not try to get 100 on the Google Page speed tool!
If you need a number to shoot for, go for 50.
4) Mobile Friendliness
The mistake people make when talking about mobile SEO is saying it’s “the future of search.”
It’s not the future. It’s already here.
Mobile search is now more than 50% of all searches.
More people search on their phones than they do on their desktops. It shouldn’t be a surprise that Google wants us to optimize the mobile experience for users.
Google has done a number of things to do this.
In the past, Google had two search indexes. A mobile index and a desktop index.
Your site could be ranking in the desktop index but not in the mobile index and vice versa.
Then, Google rolled out the “Mobilegeddon” update in 2015.
Any site that wasn’t mobile-friendly was penalized in mobile search index results.
However, if you weren’t targeting mobile search terms, you were fine and saw no impact.
In July 2019, things changed. Google decided to move its entire index to mobile-first.
This means that no matter what device you use to do a search, you’re seeing the mobile search index.
This means that even if 100% of your users find you through desktop search, you still need to allow Google’s smartphone bot to crawl your pages, in order to get indexed.
It’s no longer acceptable to hide content on your mobile site if it’s available on your desktop site.
If you hide content on mobile (via CSS, tabs etc.), Google simply won’t see that content.
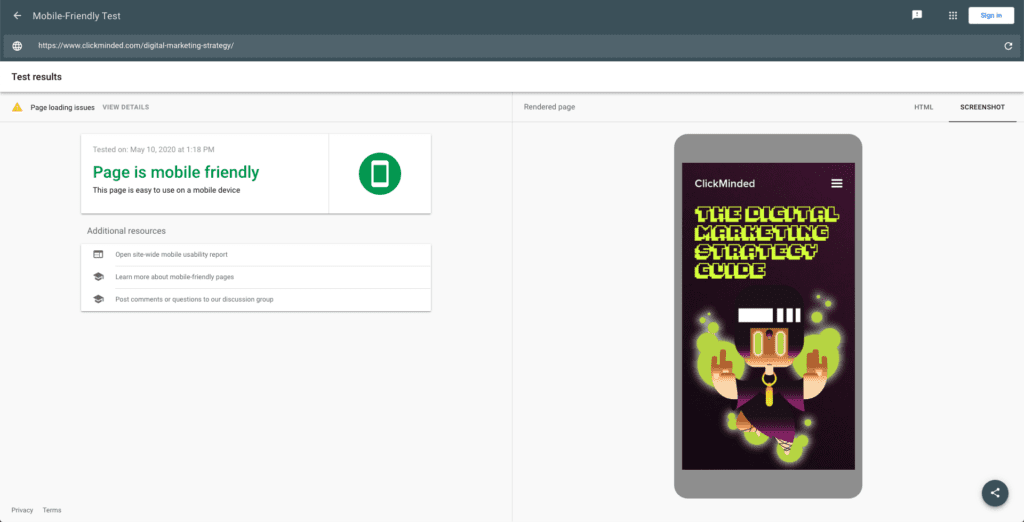
Let’s talk about the things you should do and the tools you should use to optimize your site for mobile:
- Responsive design
- Google’s mobile-friendly test tool
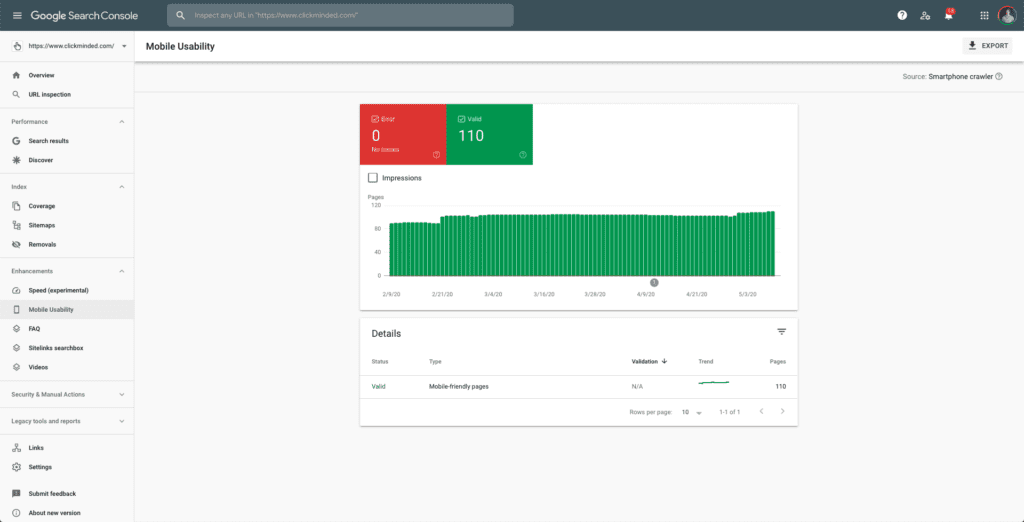
- Google search console mobile usability
- Google page speed insights
- Make your pages “thumb-friendly.”
- Use Google Search Console and Google Analytics to find gaps in mobile devices vs. desktop
For more information, check out another article on How To Make A Website Mobile Friendly by Hostgator.
5) Structured Data
Structured data refers to any organized dataset that follows a predictable format.
Not just for SEO, structured data is organized and easily understood by machine languages.
Structured Data
- Postal Codes
- Phone Numbers
- Drivers License Numbers
- Airline Reservation Codes
Unstructured Data
- Customer Feedback
- Social Media Posts
- Audio, Video & Images
- Blog Posts & Forum Threads
You’ll see the terms structured data, schema.org, rich snippets, rich cards, microdata, and JSON-LD often used interchangeably.
Similar to meta descriptions, rich snippets do not directly increase rankings but can help indirectly via increased organic click-through rate.
Here is some of the structured data you’ll most commonly see being used by Google:
Article Snippets:
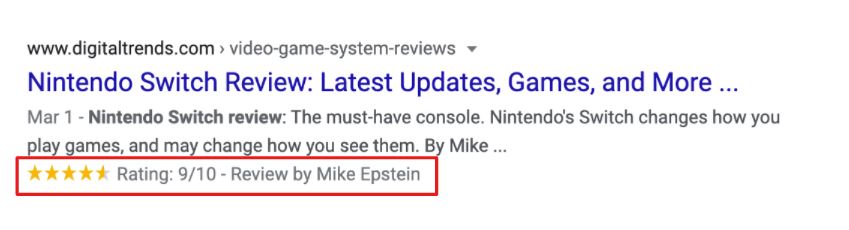
Review Snippets:
Product Snippets:

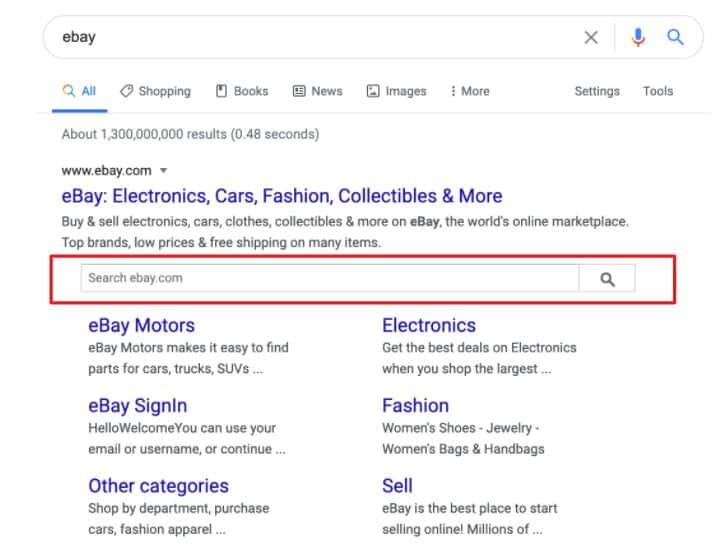
Sitelink Search Snippets:
Breadcrumb Snippets:

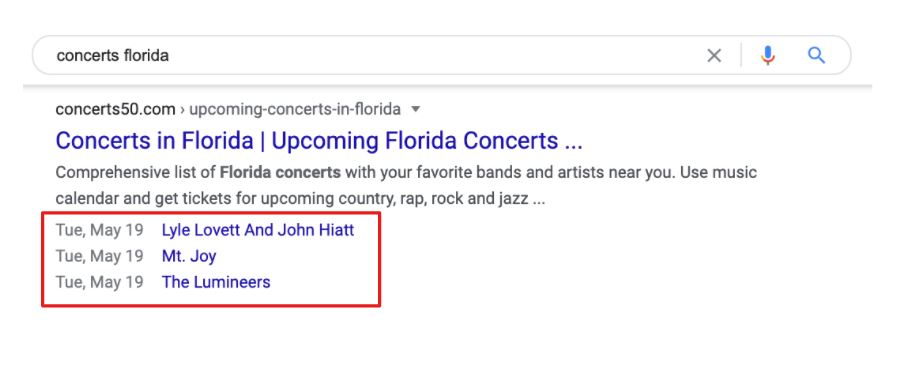
Event Snippets:
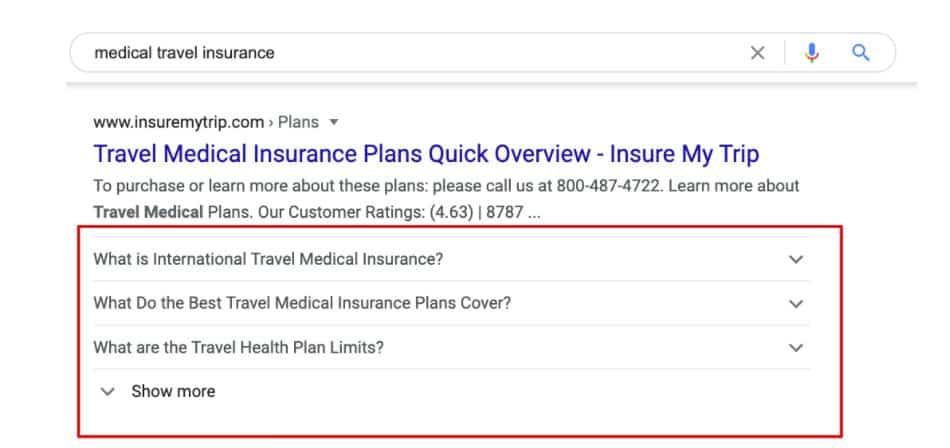
FAQ Snippets:
You can find the full list of structured data currently supported by Google-rich snippets here.
If you’re ready, here’s an efficient way to implement structured data that focuses on getting you rich results, right away:
- Search for your top core keywords
- Make a note of the keywords and competitors showing rich snippets on Page 1
- Focus on only that type of structured data and mimic what your competitors are doing.
If you want to learn more, check out HubSpot’s Beginners Guide to Structured Data for Organizing & Optimizing Your Website.
Get Your Free Technical SEO Checklist
Awesome, you made it!
You might have the best content on your site, but if you have many technical errors, google won’t be able to find your web pages.
Your site pages have to be fully optimized for technical SEO, mobile-friendly, free of duplicate content issues and well-structured.
If you want to be solid in your technical SEO strategy, check out our Technical SEO Checklist.
It is a step-by-step list of everything you need to cross off the list before your website is fully technically optimized.
It’s easy to forget little things in technical SEO, so we have a full list of every detail involved, including all these and more.
You can download it from below
Some other SEO Checklists that you can check out are: